Open-source RightAI Tools Directory
  • Discover AI
  • Submit
  • Startup
  • Blog
Open-source RightAI Tools Directory
Discover the best AI tools of 2025 with the RightAI Tools Directory!

Friend Links

AI Anime GeneratorToolsApp AI

Support

Tap4
Privacy policyTerms & ConditionsContact Us
Loading...
loading...

Aksharakuppy TextMagic

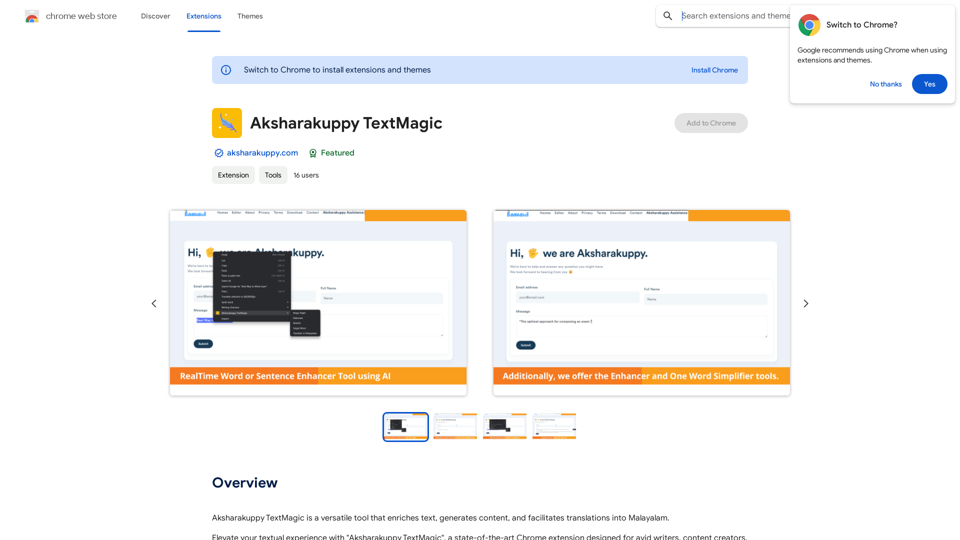
Aksharakuppy TextMagic is a versatile tool that enriches text, generates content, and facilitates translations into Malayalam.
Visit Website
Aksharakuppy TextMagic
Visit Website

Introduction

Aksharakuppy TextMagic is a powerful Chrome extension designed to enhance text, generate content, and provide translations between English and Malayalam. This innovative tool caters to writers, content creators, and anyone looking to improve their textual content. With features like text enrichment, content generation, and instant translations, Aksharakuppy TextMagic offers a comprehensive solution for elevating your writing experience.

Feature

Text Enrichment

Aksharakuppy TextMagic uses advanced algorithms to suggest improvements, synonyms, and style enhancements, helping users create more engaging and polished content.

Content Generation

The AI-driven system assists users in overcoming writer's block by generating initial content in both English and Malayalam based on a given topic.

Instant Translations

Seamlessly translate between English and Malayalam, making language switching effortless and efficient.

Free Chrome Extension

Aksharakuppy TextMagic is available as a free Chrome extension, accessible to all users without any cost.

Versatile Usage

The tool can be used for various purposes, including blog writing, article creation, and social media content generation.

Secure Data Handling

Aksharakuppy TextMagic prioritizes user data security, ensuring that information is handled safely and not sold to third parties.

FAQ

Is Aksharakuppy TextMagic a paid extension?

No, Aksharakuppy TextMagic is a free Chrome extension.

Can I use Aksharakuppy TextMagic for commercial purposes?

Yes, you can use Aksharakuppy TextMagic for commercial purposes.

Is my data safe with Aksharakuppy TextMagic?

Yes, Aksharakuppy TextMagic handles user data securely and does not sell it to third parties.

How can I start using Aksharakuppy TextMagic?

To start using Aksharakuppy TextMagic, simply add the extension to your Chrome browser. Once installed, you can begin enhancing your text, generating content, and translating between English and Malayalam.

Latest Traffic Insights

  • Monthly Visits

    205.80 M

  • Bounce Rate

    55.76%

  • Pages Per Visit

    2.73

  • Time on Site(s)

    117.23

  • Global Rank

    -

  • Country Rank

    -

Recent Visits

Traffic Sources

  • Social Media:
    0.48%
  • Paid Referrals:
    0.54%
  • Email:
    0.16%
  • Referrals:
    12.91%
  • Search Engines:
    17.01%
  • Direct:
    68.90%
More Data

Related Websites

Western Language Assistant
View Detail

Western Language Assistant

Western Language Assistant

Provides authoritative Xi Han-Han Xi dictionary references, with web-based paragraph-by-paragraph translation and PDF document translation functions, making it an essential reference tool for Spanish learners. It also allows synchronization of learning records with clients.

205.80 M
Show GPT Chats and More
View Detail

Show GPT Chats and More

Show GPT Chats and More

See GPT's conversations and extra details when you visit the GPT store.

205.80 M
Get ChatGPT for Free with Google

You can now access ChatGPT, a powerful language model, for free with Google. Here's how:

Method 1: Google Colab

* Open Google Colab ([colab.research.google.com](http://colab.research.google.com))
* Create a new notebook
* Install the `transformers` library by running `!pip install transformers`
* Import the `transformers` library and load the ChatGPT model using `from transformers import AutoModelForCausalLM, AutoTokenizer; model = AutoModelForCausalLM.from_pretrained('chatgpt'); tokenizer = AutoTokenizer.from_pretrained('chatgpt')`
* Use the model to generate text using `input_text = "Your input here"; inputs = tokenizer.encode_plus(input_text, return_tensors='pt', max_length=1024, padding='max_length', truncation=True); output = model(inputs['input_ids'], attention_mask=inputs['attention_mask']); print(tokenizer.decode(output.logits[0], skip_special_tokens=True))`

Method 2: Google Apps Script

* Open Google Apps Script ([script.google.com](http://script.google.com))
* Create a new project
* Install the `transformers` library by running `npm install transformers`
* Import the `transformers` library and load the ChatGPT model using `const { AutoModelForCausalLM, AutoTokenizer } = require('transformers'); const model = new AutoModelForCausalLM('chatgpt'); const tokenizer = new AutoTokenizer('chatgpt');`
* Use the model to generate text using `const inputText = "Your input here"; const inputs = tokenizer.encodePlus(inputText, { return_tensors: 'pt', max_length: 1024, padding: 'max_length', truncation: true }); const output = model(inputs.inputIds, inputs.attentionMask); console.log(tokenizer.decode(output.logits[0], { skipSpecialTokens: true }));`

Note: These methods require some technical knowledge and may have limitations compared to the original ChatGPT model.
View Detail

Get ChatGPT for Free with Google You can now access ChatGPT, a powerful language model, for free with Google. Here's how: Method 1: Google Colab * Open Google Colab ([colab.research.google.com](http://colab.research.google.com)) * Create a new notebook * Install the `transformers` library by running `!pip install transformers` * Import the `transformers` library and load the ChatGPT model using `from transformers import AutoModelForCausalLM, AutoTokenizer; model = AutoModelForCausalLM.from_pretrained('chatgpt'); tokenizer = AutoTokenizer.from_pretrained('chatgpt')` * Use the model to generate text using `input_text = "Your input here"; inputs = tokenizer.encode_plus(input_text, return_tensors='pt', max_length=1024, padding='max_length', truncation=True); output = model(inputs['input_ids'], attention_mask=inputs['attention_mask']); print(tokenizer.decode(output.logits[0], skip_special_tokens=True))` Method 2: Google Apps Script * Open Google Apps Script ([script.google.com](http://script.google.com)) * Create a new project * Install the `transformers` library by running `npm install transformers` * Import the `transformers` library and load the ChatGPT model using `const { AutoModelForCausalLM, AutoTokenizer } = require('transformers'); const model = new AutoModelForCausalLM('chatgpt'); const tokenizer = new AutoTokenizer('chatgpt');` * Use the model to generate text using `const inputText = "Your input here"; const inputs = tokenizer.encodePlus(inputText, { return_tensors: 'pt', max_length: 1024, padding: 'max_length', truncation: true }); const output = model(inputs.inputIds, inputs.attentionMask); console.log(tokenizer.decode(output.logits[0], { skipSpecialTokens: true }));` Note: These methods require some technical knowledge and may have limitations compared to the original ChatGPT model.

Get ChatGPT for Free with Google You can now access ChatGPT, a powerful language model, for free with Google. Here's how: Method 1: Google Colab * Open Google Colab ([colab.research.google.com](http://colab.research.google.com)) * Create a new notebook * Install the `transformers` library by running `!pip install transformers` * Import the `transformers` library and load the ChatGPT model using `from transformers import AutoModelForCausalLM, AutoTokenizer; model = AutoModelForCausalLM.from_pretrained('chatgpt'); tokenizer = AutoTokenizer.from_pretrained('chatgpt')` * Use the model to generate text using `input_text = "Your input here"; inputs = tokenizer.encode_plus(input_text, return_tensors='pt', max_length=1024, padding='max_length', truncation=True); output = model(inputs['input_ids'], attention_mask=inputs['attention_mask']); print(tokenizer.decode(output.logits[0], skip_special_tokens=True))` Method 2: Google Apps Script * Open Google Apps Script ([script.google.com](http://script.google.com)) * Create a new project * Install the `transformers` library by running `npm install transformers` * Import the `transformers` library and load the ChatGPT model using `const { AutoModelForCausalLM, AutoTokenizer } = require('transformers'); const model = new AutoModelForCausalLM('chatgpt'); const tokenizer = new AutoTokenizer('chatgpt');` * Use the model to generate text using `const inputText = "Your input here"; const inputs = tokenizer.encodePlus(inputText, { return_tensors: 'pt', max_length: 1024, padding: 'max_length', truncation: true }); const output = model(inputs.inputIds, inputs.attentionMask); console.log(tokenizer.decode(output.logits[0], { skipSpecialTokens: true }));` Note: These methods require some technical knowledge and may have limitations compared to the original ChatGPT model.

How to Add ChatGPT to All Google Searches ===================================================== Step 1: Create a Custom Search Engine -------------------------------------- * Go to the [Google Custom Search Engine](https://cse.google.com/) website and sign in with your Google account. * Click on the "New Search Engine" button. * Fill in the required information, such as the name and description of your search engine. * Click on the "Create" button. Step 2: Add ChatGPT to the Search Engine ----------------------------------------- * In the "Setup" tab, click on the "Add" button next to "Sites to search". * Enter the following URL: `https://chat.openai.com/` * Click on the "Add" button. Step 3: Configure the Search Engine -------------------------------------- * In the "Setup" tab, click on the "Edit" button next to "Search engine keywords". * Add the following keywords: `ChatGPT` * Click on the "Save" button. Step 4: Get the Search Engine Code ------------------------------------- * In the "Setup" tab, click on the "Get code" button. * Copy the HTML code provided. Step 5: Add the Search Engine to Your Browser ------------------------------------------------ * Open your browser and go to the "Settings" or "Options" page. * Look for the "Search engine" or "Default search engine" option. * Click on the "Add" or "Manage search engines" button. * Paste the HTML code you copied earlier. * Click on the "Add" or "Save" button. You're Done! =============== Now, whenever you search on Google, ChatGPT will be included in the search results. You can also use the custom search engine URL provided by Google to search directly.

205.80 M
Thrive as a Freelancer
View Detail

Thrive as a Freelancer

Thrive as a Freelancer

Your all-in-one solution for maximizing efficiency and income

0
Fast translation
View Detail

Fast translation

Fast translation

Fast translation for full text and word highlighting.

205.80 M
U-Publish Seller Finder
View Detail

U-Publish Seller Finder

U-Publish Seller Finder

U-Publish Seller Finder

205.80 M
French Fry AI
View Detail

French Fry AI

French Fry AI

French Fry AI

205.80 M
Ask Your Bookmarks
View Detail

Ask Your Bookmarks

Ask Your Bookmarks

Simple and Smart Bookmark Manager. Great AI-powered search capability, find the bookmark you want with fuzzy descriptions.

205.80 M