Open-source RightAI Tools Directory
  • Discover AI
  • Submit
  • Startup
  • Blog
Open-source RightAI Tools Directory
Discover the best AI tools of 2025 with the RightAI Tools Directory!

Friend Links

AI Anime GeneratorToolsApp AI

Support

Tap4
Privacy policyTerms & ConditionsContact Us
Loading...
loading...

AI Image Tools for Free Online | PicPicAI

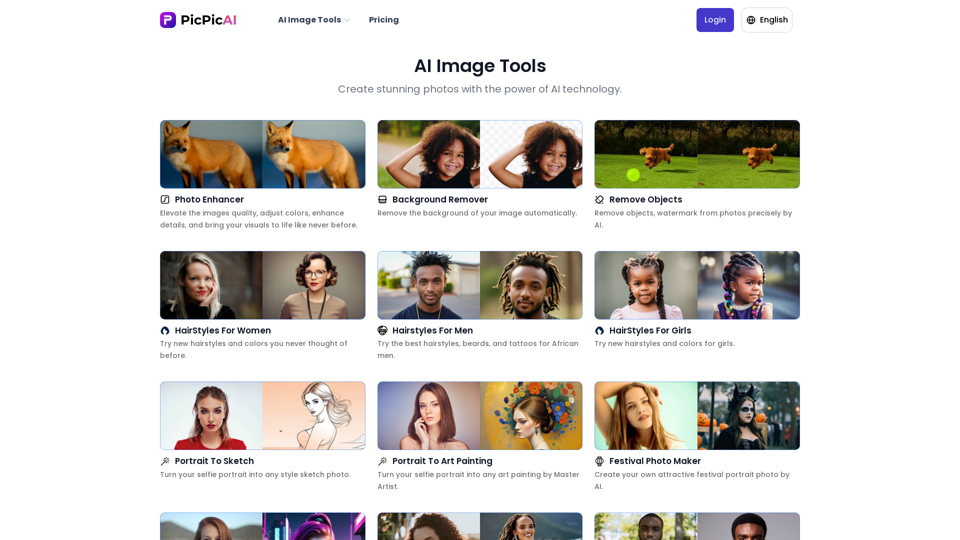
- Remove Background - Photo Enhancer - Photo Upscaler - Change Background Color - Restore Old Photos - Colorize Photos - Compress Photos - Photo Retouch
Visit Website
AI Image Tools for Free Online | PicPicAI
Visit Website

Introduction

PicPicAI is a comprehensive online platform offering a variety of AI-powered image editing tools. It provides users with 20 free credits upon registration, allowing them to explore and utilize various features. The platform caters to both beginners and professionals, offering easy-to-use tools for enhancing photos, removing backgrounds, generating portraits, and more.

Feature

AI Image Editor

  • Create stunning AI art
  • Change background color
  • Remove objects from images
  • Compress photos for optimal file size

AI Portrait Generator

  • Generate various hairstyles for women
  • Create neonpunk-style portraits
  • Convert portraits to sketches
  • Cartoonify portraits
  • Generate professional headshots
  • Restore old photos
  • Enhance photo quality
  • Colorize black and white photos
  • AI-powered portrait enhancement
  • Upscale photos for higher resolution

Photo Enhancement Tools

  • Photo Enhancer: Improve image quality, adjust colors, and enhance details
  • Background Remover: Automatically remove image backgrounds
  • Object Removal: Precisely remove unwanted objects or watermarks from photos
  • Hairstyle Generator: Experiment with new hairstyles and colors
  • Portrait to Sketch Converter: Transform selfies into stylized sketch photos
  • Portrait Cartoonifier: Convert portrait photos into cartoon-style images

User-Friendly Interface

  • Intuitive design suitable for both beginners and professionals
  • No learning curve required for using the tools

Cost-Effective Solution

  • Affordable pricing for a wide range of image editing tools
  • Efficient processing for quick results

FAQ

Who can benefit from PicPicAI's tools?

PicPicAI's tools are beneficial for a wide range of users, including social media managers, marketers, content creators, and individuals looking to enhance their personal photos. These AI-powered tools can transform the way users create visuals for both business and personal use, helping to create stunning images, save time, and streamline the creative process.

How do I use PicPicAI's photo tools?

Using PicPicAI's photo tools is simple:

  1. Navigate to the desired photo tool page
  2. Upload your image
  3. Let the AI process and enhance your photo automatically

What makes PicPicAI stand out from other image editing platforms?

PicPicAI distinguishes itself through:

  1. Comprehensive toolset: Offering a wide range of AI-powered image editing tools in one platform
  2. User-friendly interface: Easy-to-use design suitable for all skill levels
  3. Affordability: Cost-effective solution for professional-quality image editing
  4. Efficiency: Quick processing and convenient user experience

Latest Traffic Insights

  • Monthly Visits

    15.66 K

  • Bounce Rate

    34.80%

  • Pages Per Visit

    2.07

  • Time on Site(s)

    28.68

  • Global Rank

    1557619

  • Country Rank

    Russia 115425

Recent Visits

Traffic Sources

  • Social Media:
    2.51%
  • Paid Referrals:
    0.53%
  • Email:
    0.17%
  • Referrals:
    10.52%
  • Search Engines:
    49.46%
  • Direct:
    36.68%
More Data

Related Websites

Batch Save ChatGPT to Notion

This is a guide on how to save multiple ChatGPT responses to Notion in a batch. 

Tools You'll Need:

* ChatGPT: An AI chatbot that can generate text.
* Notion: A note-taking and project management tool.
* Python: A programming language.
* Requests Library: A Python library for making HTTP requests.

Steps:

1. Get Your Notion API Token:
   - Go to your Notion workspace settings.
   - Navigate to the "Integrations" tab.
   - Click "Create new integration" and choose "API Token".
   - Copy your API token.

2. Install Python Libraries:
   - Open your terminal or command prompt.
   - Type `pip install requests` and press Enter.

3. Write Python Script:
   - Create a new Python file (e.g., `save_chatgpt_to_notion.py`).
   - Paste the following code into the file, replacing `YOUR_NOTION_API_TOKEN` with your actual token:

```python
import requests

def save_chatgpt_response_to_notion(response, page_id, token):
  """Saves a ChatGPT response to a Notion page."""
  url = f"https://api.notion.com/v1/pages/{page_id}/children"
  headers = {"Authorization": f"Bearer {token}"}
  data = {
    "parent": {
      "page_id": page_id
    },
    "properties": {
      "title": {
        "title": [
          {
            "text": {
              "content": "ChatGPT Response"
            }
          }
        ]
      },
      "content": {
        "rich_text": [
          {
            "text": {
              "content": response
            }
          }
        ]
      }
    }
  }
  response = requests.post(url, headers=headers, json=data)
  print(response.status_code)

Example usage
page_id = "YOUR_NOTION_PAGE_ID"
token = "YOUR_NOTION_API_TOKEN"

Get ChatGPT responses (replace with your actual ChatGPT interaction)
chatgpt_responses = [
  "This is the first ChatGPT response.",
  "This is the second ChatGPT response.",
  "This is the third ChatGPT response."
]

Save each response to Notion
for response in chatgpt_responses:
  save_chatgpt_response_to_notion(response, page_id, token)
```

4. Run the Script:
   - In your terminal, navigate to the directory where you saved the Python file.
   - Type `python save_chatgpt_to_notion.py` and press Enter.

5. Check Notion:
   - Open your Notion workspace and go to the page specified by `page_id`.
   - You should see your ChatGPT responses saved as separate blocks.
View Detail

Batch Save ChatGPT to Notion This is a guide on how to save multiple ChatGPT responses to Notion in a batch. Tools You'll Need: * ChatGPT: An AI chatbot that can generate text. * Notion: A note-taking and project management tool. * Python: A programming language. * Requests Library: A Python library for making HTTP requests. Steps: 1. Get Your Notion API Token: - Go to your Notion workspace settings. - Navigate to the "Integrations" tab. - Click "Create new integration" and choose "API Token". - Copy your API token. 2. Install Python Libraries: - Open your terminal or command prompt. - Type `pip install requests` and press Enter. 3. Write Python Script: - Create a new Python file (e.g., `save_chatgpt_to_notion.py`). - Paste the following code into the file, replacing `YOUR_NOTION_API_TOKEN` with your actual token: ```python import requests def save_chatgpt_response_to_notion(response, page_id, token): """Saves a ChatGPT response to a Notion page.""" url = f"https://api.notion.com/v1/pages/{page_id}/children" headers = {"Authorization": f"Bearer {token}"} data = { "parent": { "page_id": page_id }, "properties": { "title": { "title": [ { "text": { "content": "ChatGPT Response" } } ] }, "content": { "rich_text": [ { "text": { "content": response } } ] } } } response = requests.post(url, headers=headers, json=data) print(response.status_code) Example usage page_id = "YOUR_NOTION_PAGE_ID" token = "YOUR_NOTION_API_TOKEN" Get ChatGPT responses (replace with your actual ChatGPT interaction) chatgpt_responses = [ "This is the first ChatGPT response.", "This is the second ChatGPT response.", "This is the third ChatGPT response." ] Save each response to Notion for response in chatgpt_responses: save_chatgpt_response_to_notion(response, page_id, token) ``` 4. Run the Script: - In your terminal, navigate to the directory where you saved the Python file. - Type `python save_chatgpt_to_notion.py` and press Enter. 5. Check Notion: - Open your Notion workspace and go to the page specified by `page_id`. - You should see your ChatGPT responses saved as separate blocks.

Batch Save ChatGPT to Notion This is a guide on how to save multiple ChatGPT responses to Notion in a batch. Tools You'll Need: * ChatGPT: An AI chatbot that can generate text. * Notion: A note-taking and project management tool. * Python: A programming language. * Requests Library: A Python library for making HTTP requests. Steps: 1. Get Your Notion API Token: - Go to your Notion workspace settings. - Navigate to the "Integrations" tab. - Click "Create new integration" and choose "API Token". - Copy your API token. 2. Install Python Libraries: - Open your terminal or command prompt. - Type `pip install requests` and press Enter. 3. Write Python Script: - Create a new Python file (e.g., `save_chatgpt_to_notion.py`). - Paste the following code into the file, replacing `YOUR_NOTION_API_TOKEN` with your actual token: ```python import requests def save_chatgpt_response_to_notion(response, page_id, token): """Saves a ChatGPT response to a Notion page.""" url = f"https://api.notion.com/v1/pages/{page_id}/children" headers = {"Authorization": f"Bearer {token}"} data = { "parent": { "page_id": page_id }, "properties": { "title": { "title": [ { "text": { "content": "ChatGPT Response" } } ] }, "content": { "rich_text": [ { "text": { "content": response } } ] } } } response = requests.post(url, headers=headers, json=data) print(response.status_code) Example usage page_id = "YOUR_NOTION_PAGE_ID" token = "YOUR_NOTION_API_TOKEN" Get ChatGPT responses (replace with your actual ChatGPT interaction) chatgpt_responses = [ "This is the first ChatGPT response.", "This is the second ChatGPT response.", "This is the third ChatGPT response." ] Save each response to Notion for response in chatgpt_responses: save_chatgpt_response_to_notion(response, page_id, token) ``` 4. Run the Script: - In your terminal, navigate to the directory where you saved the Python file. - Type `python save_chatgpt_to_notion.py` and press Enter. 5. Check Notion: - Open your Notion workspace and go to the page specified by `page_id`. - You should see your ChatGPT responses saved as separate blocks.

Save ChatGPT Conversations to Notion with One Click Export your ChatGPT conversations directly to Notion with a single click.

193.90 M
Midjourney API - Automate Midjourney AI Image Generation 

This document outlines how to use the Midjourney API to automate the generation of AI images. 

What is the Midjourney API?

The Midjourney API allows developers to programmatically interact with the powerful Midjourney AI model. This means you can generate images, control various parameters, and integrate Midjourney into your own applications and workflows.

Why Use the Midjourney API?

* Automation: Automate the creation of images for various purposes, such as marketing materials, website content, or research projects.
* Customization: Fine-tune image generation by controlling parameters like aspect ratio, style, and seed values.
* Integration: Seamlessly integrate Midjourney's capabilities into your existing tools and platforms.

Getting Started

1. Sign Up for a Midjourney Account: You'll need a Midjourney account to access the API.

2. Obtain an API Key: Once you have an account, you can generate an API key from your account settings.

3. Choose a Programming Language: The Midjourney API supports various programming languages, including Python, JavaScript, and Go.

4. Install the API Client: Install the appropriate API client library for your chosen language.

5. Start Generating Images: Use the API client to send image generation requests to the Midjourney server.

Example (Python):

```python
import midjourney

Replace with your actual API key
api_key = "YOUR_API_KEY"

Create a Midjourney client
client = midjourney.Client(api_key=api_key)

Generate an image
response = client.create_image(prompt="A cat wearing a hat", num_images=1)

Print the image URL
print(response.images[0].url)
```

Documentation and Resources

For detailed information about the Midjourney API, including available endpoints, parameters, and examples, please refer to the official documentation: [https://docs.midjourney.com/](https://docs.midjourney.com/)
View Detail

Midjourney API - Automate Midjourney AI Image Generation This document outlines how to use the Midjourney API to automate the generation of AI images. What is the Midjourney API? The Midjourney API allows developers to programmatically interact with the powerful Midjourney AI model. This means you can generate images, control various parameters, and integrate Midjourney into your own applications and workflows. Why Use the Midjourney API? * Automation: Automate the creation of images for various purposes, such as marketing materials, website content, or research projects. * Customization: Fine-tune image generation by controlling parameters like aspect ratio, style, and seed values. * Integration: Seamlessly integrate Midjourney's capabilities into your existing tools and platforms. Getting Started 1. Sign Up for a Midjourney Account: You'll need a Midjourney account to access the API. 2. Obtain an API Key: Once you have an account, you can generate an API key from your account settings. 3. Choose a Programming Language: The Midjourney API supports various programming languages, including Python, JavaScript, and Go. 4. Install the API Client: Install the appropriate API client library for your chosen language. 5. Start Generating Images: Use the API client to send image generation requests to the Midjourney server. Example (Python): ```python import midjourney Replace with your actual API key api_key = "YOUR_API_KEY" Create a Midjourney client client = midjourney.Client(api_key=api_key) Generate an image response = client.create_image(prompt="A cat wearing a hat", num_images=1) Print the image URL print(response.images[0].url) ``` Documentation and Resources For detailed information about the Midjourney API, including available endpoints, parameters, and examples, please refer to the official documentation: [https://docs.midjourney.com/](https://docs.midjourney.com/)

Midjourney API - Automate Midjourney AI Image Generation This document outlines how to use the Midjourney API to automate the generation of AI images. What is the Midjourney API? The Midjourney API allows developers to programmatically interact with the powerful Midjourney AI model. This means you can generate images, control various parameters, and integrate Midjourney into your own applications and workflows. Why Use the Midjourney API? * Automation: Automate the creation of images for various purposes, such as marketing materials, website content, or research projects. * Customization: Fine-tune image generation by controlling parameters like aspect ratio, style, and seed values. * Integration: Seamlessly integrate Midjourney's capabilities into your existing tools and platforms. Getting Started 1. Sign Up for a Midjourney Account: You'll need a Midjourney account to access the API. 2. Obtain an API Key: Once you have an account, you can generate an API key from your account settings. 3. Choose a Programming Language: The Midjourney API supports various programming languages, including Python, JavaScript, and Go. 4. Install the API Client: Install the appropriate API client library for your chosen language. 5. Start Generating Images: Use the API client to send image generation requests to the Midjourney server. Example (Python): ```python import midjourney Replace with your actual API key api_key = "YOUR_API_KEY" Create a Midjourney client client = midjourney.Client(api_key=api_key) Generate an image response = client.create_image(prompt="A cat wearing a hat", num_images=1) Print the image URL print(response.images[0].url) ``` Documentation and Resources For detailed information about the Midjourney API, including available endpoints, parameters, and examples, please refer to the official documentation: [https://docs.midjourney.com/](https://docs.midjourney.com/)

Easily integrate Midjourney AI into your apps using the Midjourney API. Start creating AI images automatically today!

0
AI-Powered Cover Letter
==========================

Introduction

As a highly motivated and innovative professional, I am excited to apply for the [Position] role at [Company]. With a strong background in [Industry/Field], I am confident that my skills and experience make me an ideal candidate for this position.

Summary

With [Number] years of experience in [Industry/Field], I have developed a unique combination of skills in [Key Skills]. My expertise in [Technical Skills] has enabled me to [Desirable Outcome], resulting in [Desirable Metric]. I am excited to leverage my skills to drive success at [Company].

Achievements

* [ Achievement 1 ]: Developed and implemented [Project/Initiative], resulting in [Desirable Metric] and [Desirable Outcome].
* [ Achievement 2 ]: Successfully [Key Skill] to [Desirable Outcome], resulting in [Desirable Metric].
* [ Achievement 3 ]: Collaborated with [Team/Department] to [Desirable Outcome], resulting in [Desirable Metric].

Education

* [Degree], [Field of Study], [University], [Graduation Date]
* [Relevant Coursework or Specialization]

Skills

* Technical Skills: [Technical Skill 1], [Technical Skill 2], [Technical Skill 3]
* Soft Skills: [Soft Skill 1], [Soft Skill 2], [Soft Skill 3]

Why [Company]?

I am drawn to [Company] because of its [Reason for Interest]. I am impressed by the company's [Initiative/Value] and believe that my skills and experience align with its mission to [Company Mission].

Conclusion

Thank you for considering my application. I am excited about the opportunity to contribute to [Company] and discuss how my skills and experience can drive success. Please feel free to contact me at [Contact Information].

Sincerely,
[Your Name]
View Detail

AI-Powered Cover Letter ========================== Introduction As a highly motivated and innovative professional, I am excited to apply for the [Position] role at [Company]. With a strong background in [Industry/Field], I am confident that my skills and experience make me an ideal candidate for this position. Summary With [Number] years of experience in [Industry/Field], I have developed a unique combination of skills in [Key Skills]. My expertise in [Technical Skills] has enabled me to [Desirable Outcome], resulting in [Desirable Metric]. I am excited to leverage my skills to drive success at [Company]. Achievements * [ Achievement 1 ]: Developed and implemented [Project/Initiative], resulting in [Desirable Metric] and [Desirable Outcome]. * [ Achievement 2 ]: Successfully [Key Skill] to [Desirable Outcome], resulting in [Desirable Metric]. * [ Achievement 3 ]: Collaborated with [Team/Department] to [Desirable Outcome], resulting in [Desirable Metric]. Education * [Degree], [Field of Study], [University], [Graduation Date] * [Relevant Coursework or Specialization] Skills * Technical Skills: [Technical Skill 1], [Technical Skill 2], [Technical Skill 3] * Soft Skills: [Soft Skill 1], [Soft Skill 2], [Soft Skill 3] Why [Company]? I am drawn to [Company] because of its [Reason for Interest]. I am impressed by the company's [Initiative/Value] and believe that my skills and experience align with its mission to [Company Mission]. Conclusion Thank you for considering my application. I am excited about the opportunity to contribute to [Company] and discuss how my skills and experience can drive success. Please feel free to contact me at [Contact Information]. Sincerely, [Your Name]

AI-Powered Cover Letter ========================== Introduction As a highly motivated and innovative professional, I am excited to apply for the [Position] role at [Company]. With a strong background in [Industry/Field], I am confident that my skills and experience make me an ideal candidate for this position. Summary With [Number] years of experience in [Industry/Field], I have developed a unique combination of skills in [Key Skills]. My expertise in [Technical Skills] has enabled me to [Desirable Outcome], resulting in [Desirable Metric]. I am excited to leverage my skills to drive success at [Company]. Achievements * [ Achievement 1 ]: Developed and implemented [Project/Initiative], resulting in [Desirable Metric] and [Desirable Outcome]. * [ Achievement 2 ]: Successfully [Key Skill] to [Desirable Outcome], resulting in [Desirable Metric]. * [ Achievement 3 ]: Collaborated with [Team/Department] to [Desirable Outcome], resulting in [Desirable Metric]. Education * [Degree], [Field of Study], [University], [Graduation Date] * [Relevant Coursework or Specialization] Skills * Technical Skills: [Technical Skill 1], [Technical Skill 2], [Technical Skill 3] * Soft Skills: [Soft Skill 1], [Soft Skill 2], [Soft Skill 3] Why [Company]? I am drawn to [Company] because of its [Reason for Interest]. I am impressed by the company's [Initiative/Value] and believe that my skills and experience align with its mission to [Company Mission]. Conclusion Thank you for considering my application. I am excited about the opportunity to contribute to [Company] and discuss how my skills and experience can drive success. Please feel free to contact me at [Contact Information]. Sincerely, [Your Name]

Craft tailored cover letters in seconds using AI, based on your CV and the job description. ✍️🤖📄

193.90 M
ChatGPT on Google
View Detail

ChatGPT on Google

ChatGPT on Google

Use Google to access ChatGPT and see the AI chatbot's answers next to regular search results.

193.90 M
TextGPT - Smarter Text Input by OpenAI
View Detail

TextGPT - Smarter Text Input by OpenAI

TextGPT - Smarter Text Input by OpenAI

TextGPT: Your Virtual Co-Pilot for Smarter Text Input in the Browser, Powered by OpenAI's ChatGPT

193.90 M
GPT-trainer - AI Chatbot over Your Own Data
View Detail

GPT-trainer - AI Chatbot over Your Own Data

GPT-trainer - AI Chatbot over Your Own Data

Create your own AI helper that gives you the information you need, whenever you need it. You don't need to know how to code!

193.90 M
Iconopedia
View Detail

Iconopedia

Iconopedia

Generate Stunning Images with AI Let's explore the world of AI-powered image generation and unleash your creativity! What is AI Image Generation? AI image generation uses artificial intelligence algorithms to create images from text descriptions, known as "prompts." How Does it Work? These powerful models, trained on massive datasets of images and text, learn the relationships between words and visual concepts. When you provide a prompt, the AI interprets it and generates a corresponding image. Benefits of AI Image Generation: * Effortless Creativity: Bring your ideas to life without needing artistic skills. * Endless Possibilities: Explore unique concepts and styles with ease. * Rapid Prototyping: Quickly visualize designs and concepts. * Personalized Content: Create custom images tailored to your needs. Popular AI Image Generators: * DALL-E 2: Known for its photorealistic and imaginative results. * Midjourney: Creates artistic and dreamlike images. * Stable Diffusion: Open-source and highly customizable. * Craiyon (formerly DALL-E mini): A free and accessible option. Tips for Generating Stunning Images: * Be Specific: Provide clear and detailed prompts. * Use Descriptive Language: Include adjectives, nouns, and verbs to guide the AI. * Experiment with Styles: Explore different artistic styles and aesthetics. * Iterate and Refine: Adjust your prompts and settings to achieve your desired outcome. Let your imagination run wild and discover the incredible potential of AI image generation!

0
Screenshoter, Screen Recording, ChatGPT
View Detail

Screenshoter, Screen Recording, ChatGPT

Screenshoter, Screen Recording, ChatGPT

NEW FEATURE: 'Ask AI' based on ChatGPT! Highlight an area and ask it to solve a problem, explain, translate, and more!

193.90 M