Open-source RightAI Tools Directory
  • Discover AI
  • Submit
  • Startup
  • Blog
Open-source RightAI Tools Directory
Discover the best AI tools of 2025 with the RightAI Tools Directory!

Friend Links

AI Anime GeneratorToolsApp AI

Support

Tap4
Privacy policyTerms & ConditionsContact Us
Loading...
loading...

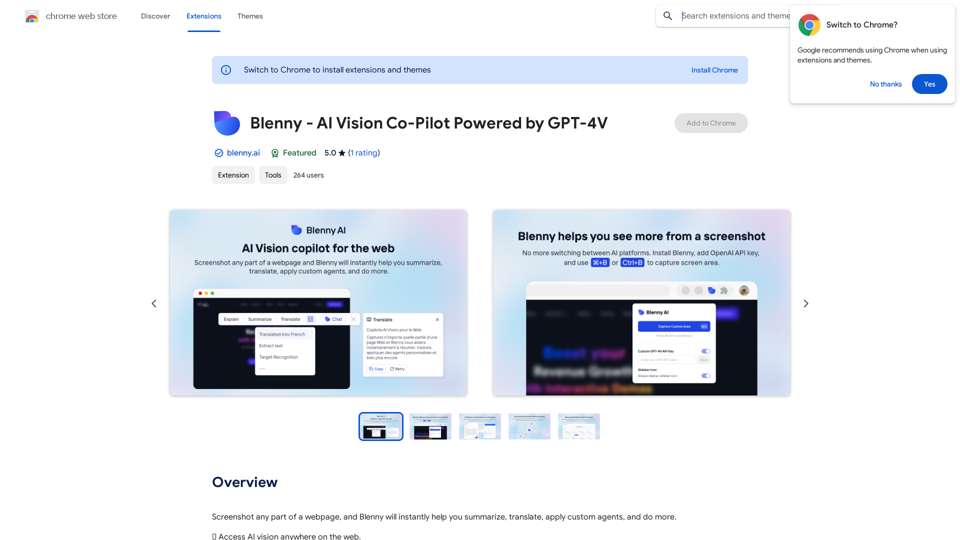
Blenny - AI Vision Co-Pilot Powered by GPT-4V

Screenshot any part of a webpage, and Blenny will instantly help you summarize, translate, apply custom agents, and do more.
Visit Website
Blenny - AI Vision Co-Pilot Powered by GPT-4V
Visit Website

Introduction

Blenny is an AI Vision Co-Pilot Chrome extension powered by GPT-4. It adds AI vision capabilities to your browser, allowing you to analyze information from any part of the web. Users can snapshot screen areas and perform quick actions like AI summaries and translations. Blenny offers customization options, a Prompt Gallery, and supports custom API keys for extended use.

Feature

AI Vision Integration

Blenny seamlessly integrates AI vision into your browser, enabling comprehensive analysis of web content through screen snapshots.

Customizable AI Agents

Users can create and customize their own AI agents, tailoring Blenny to various specific use cases and needs.

Prompt Gallery

Access a wide range of AI vision-assisted tasks through the Prompt Gallery at https://www.blenny.ai/prompt-gallery, enhancing efficiency and convenience.

Flexible API Key Usage

While Blenny provides limited trial access, users can add their own API key to continue using the service beyond the trial limit.

Easy Activation

Activate Blenny quickly using keyboard shortcuts: Command (or Cmd) ⌘ + B on Mac, or Ctrl + B on Windows.

Quick Actions

After capturing a screen area, users can choose from various quick actions to analyze the content effectively.

FAQ

What is Blenny?

Blenny is an AI Vision Co-Pilot Chrome extension powered by GPT-4. It adds AI vision capabilities to your browser, allowing you to analyze information from any part of the web through screen snapshots.

How do I use Blenny?

To use Blenny:

  1. Install the Chrome extension
  2. Activate it using Command (or Cmd) ⌘ + B on Mac, or Ctrl + B on Windows
  3. Snapshot a screen area
  4. Choose from the list of quick actions to analyze the content

Is Blenny free?

Blenny offers a limited trial access. Once you reach the trial limit, you can continue using Blenny by adding your own API key. Subscription modules are planned for future implementation.

Latest Traffic Insights

  • Monthly Visits

    290.25 M

  • Bounce Rate

    55.49%

  • Pages Per Visit

    2.84

  • Time on Site(s)

    113.64

  • Global Rank

    -

  • Country Rank

    -

Recent Visits

Traffic Sources

  • Social Media:
    0.68%
  • Paid Referrals:
    0.54%
  • Email:
    0.11%
  • Referrals:
    14.58%
  • Search Engines:
    15.20%
  • Direct:
    68.89%
More Data

Related Websites

Integrito β€” Analyze Text, Check Plagiarism & AI
View Detail

Integrito β€” Analyze Text, Check Plagiarism & AI

Integrito β€” Analyze Text, Check Plagiarism & AI

This extension is a helpful all-in-one tool for education and working with texts.

290.25 M
Real-Time Video & Audio Translation
View Detail

Real-Time Video & Audio Translation

Real-Time Video & Audio Translation

AI-powered real-time translation for any video, meeting, or live-stream across 100+ languages.

290.25 M
CSV and Parquet Viewer
View Detail

CSV and Parquet Viewer

CSV and Parquet Viewer

View and filter CSV and Parquet files in your browser.

290.25 M
Copilot for Tinder & Bumble

Tired of swiping endlessly? Let Copilot handle your dating app game!

* Craft irresistible bios:  Copilot helps you write witty and engaging bios that highlight your best qualities.
* Spark conversations:  Struggling to come up with opening lines? Copilot suggests clever and personalized messages to break the ice.
* Navigate tricky situations:  Copilot offers advice and guidance on handling awkward moments or difficult conversations.
* Boost your matches:  With Copilot's help, you'll stand out from the crowd and attract more matches.
* Save time and energy:  Let Copilot do the heavy lifting so you can focus on enjoying the dating experience. 


Start swiping smarter, not harder. Get Copilot today!
View Detail

Copilot for Tinder & Bumble Tired of swiping endlessly? Let Copilot handle your dating app game! * Craft irresistible bios: Copilot helps you write witty and engaging bios that highlight your best qualities. * Spark conversations: Struggling to come up with opening lines? Copilot suggests clever and personalized messages to break the ice. * Navigate tricky situations: Copilot offers advice and guidance on handling awkward moments or difficult conversations. * Boost your matches: With Copilot's help, you'll stand out from the crowd and attract more matches. * Save time and energy: Let Copilot do the heavy lifting so you can focus on enjoying the dating experience. Start swiping smarter, not harder. Get Copilot today!

Copilot for Tinder & Bumble Tired of swiping endlessly? Let Copilot handle your dating app game! * Craft irresistible bios: Copilot helps you write witty and engaging bios that highlight your best qualities. * Spark conversations: Struggling to come up with opening lines? Copilot suggests clever and personalized messages to break the ice. * Navigate tricky situations: Copilot offers advice and guidance on handling awkward moments or difficult conversations. * Boost your matches: With Copilot's help, you'll stand out from the crowd and attract more matches. * Save time and energy: Let Copilot do the heavy lifting so you can focus on enjoying the dating experience. Start swiping smarter, not harder. Get Copilot today!

Have meaningful conversations and go on more dates with the help of a collection of AI tools.

290.25 M
AI Localizer - Easily Translate Your Project Code
View Detail

AI Localizer - Easily Translate Your Project Code

AI Localizer - Easily Translate Your Project Code

Seamlessly add localized translations to your Xcode projects. Add up to 37 languages to your app automatically, using the power of AI.

226.16 K
AI Summary Pro: Instant Text & Page Insights
View Detail

AI Summary Pro: Instant Text & Page Insights

AI Summary Pro: Instant Text & Page Insights

Use advanced AI to get short summaries of articles, texts, and websites.

290.25 M
Get ChatGPT for Free with Google

You can now access ChatGPT, a powerful language model, for free with Google. Here's how:

Method 1: Google Colab

* Open Google Colab ([colab.research.google.com](http://colab.research.google.com))
* Create a new notebook
* Install the `transformers` library by running `!pip install transformers`
* Import the `transformers` library and load the ChatGPT model using `from transformers import AutoModelForCausalLM, AutoTokenizer; model = AutoModelForCausalLM.from_pretrained('chatgpt'); tokenizer = AutoTokenizer.from_pretrained('chatgpt')`
* Use the model to generate text using `input_text = "Your input here"; inputs = tokenizer.encode_plus(input_text, return_tensors='pt', max_length=1024, padding='max_length', truncation=True); output = model(inputs['input_ids'], attention_mask=inputs['attention_mask']); print(tokenizer.decode(output.logits[0], skip_special_tokens=True))`

Method 2: Google Apps Script

* Open Google Apps Script ([script.google.com](http://script.google.com))
* Create a new project
* Install the `transformers` library by running `npm install transformers`
* Import the `transformers` library and load the ChatGPT model using `const { AutoModelForCausalLM, AutoTokenizer } = require('transformers'); const model = new AutoModelForCausalLM('chatgpt'); const tokenizer = new AutoTokenizer('chatgpt');`
* Use the model to generate text using `const inputText = "Your input here"; const inputs = tokenizer.encodePlus(inputText, { return_tensors: 'pt', max_length: 1024, padding: 'max_length', truncation: true }); const output = model(inputs.inputIds, inputs.attentionMask); console.log(tokenizer.decode(output.logits[0], { skipSpecialTokens: true }));`

Note: These methods require some technical knowledge and may have limitations compared to the original ChatGPT model.
View Detail

Get ChatGPT for Free with Google You can now access ChatGPT, a powerful language model, for free with Google. Here's how: Method 1: Google Colab * Open Google Colab ([colab.research.google.com](http://colab.research.google.com)) * Create a new notebook * Install the `transformers` library by running `!pip install transformers` * Import the `transformers` library and load the ChatGPT model using `from transformers import AutoModelForCausalLM, AutoTokenizer; model = AutoModelForCausalLM.from_pretrained('chatgpt'); tokenizer = AutoTokenizer.from_pretrained('chatgpt')` * Use the model to generate text using `input_text = "Your input here"; inputs = tokenizer.encode_plus(input_text, return_tensors='pt', max_length=1024, padding='max_length', truncation=True); output = model(inputs['input_ids'], attention_mask=inputs['attention_mask']); print(tokenizer.decode(output.logits[0], skip_special_tokens=True))` Method 2: Google Apps Script * Open Google Apps Script ([script.google.com](http://script.google.com)) * Create a new project * Install the `transformers` library by running `npm install transformers` * Import the `transformers` library and load the ChatGPT model using `const { AutoModelForCausalLM, AutoTokenizer } = require('transformers'); const model = new AutoModelForCausalLM('chatgpt'); const tokenizer = new AutoTokenizer('chatgpt');` * Use the model to generate text using `const inputText = "Your input here"; const inputs = tokenizer.encodePlus(inputText, { return_tensors: 'pt', max_length: 1024, padding: 'max_length', truncation: true }); const output = model(inputs.inputIds, inputs.attentionMask); console.log(tokenizer.decode(output.logits[0], { skipSpecialTokens: true }));` Note: These methods require some technical knowledge and may have limitations compared to the original ChatGPT model.

Get ChatGPT for Free with Google You can now access ChatGPT, a powerful language model, for free with Google. Here's how: Method 1: Google Colab * Open Google Colab ([colab.research.google.com](http://colab.research.google.com)) * Create a new notebook * Install the `transformers` library by running `!pip install transformers` * Import the `transformers` library and load the ChatGPT model using `from transformers import AutoModelForCausalLM, AutoTokenizer; model = AutoModelForCausalLM.from_pretrained('chatgpt'); tokenizer = AutoTokenizer.from_pretrained('chatgpt')` * Use the model to generate text using `input_text = "Your input here"; inputs = tokenizer.encode_plus(input_text, return_tensors='pt', max_length=1024, padding='max_length', truncation=True); output = model(inputs['input_ids'], attention_mask=inputs['attention_mask']); print(tokenizer.decode(output.logits[0], skip_special_tokens=True))` Method 2: Google Apps Script * Open Google Apps Script ([script.google.com](http://script.google.com)) * Create a new project * Install the `transformers` library by running `npm install transformers` * Import the `transformers` library and load the ChatGPT model using `const { AutoModelForCausalLM, AutoTokenizer } = require('transformers'); const model = new AutoModelForCausalLM('chatgpt'); const tokenizer = new AutoTokenizer('chatgpt');` * Use the model to generate text using `const inputText = "Your input here"; const inputs = tokenizer.encodePlus(inputText, { return_tensors: 'pt', max_length: 1024, padding: 'max_length', truncation: true }); const output = model(inputs.inputIds, inputs.attentionMask); console.log(tokenizer.decode(output.logits[0], { skipSpecialTokens: true }));` Note: These methods require some technical knowledge and may have limitations compared to the original ChatGPT model.

How to Add ChatGPT to All Google Searches ===================================================== Step 1: Create a Custom Search Engine -------------------------------------- * Go to the [Google Custom Search Engine](https://cse.google.com/) website and sign in with your Google account. * Click on the "New Search Engine" button. * Fill in the required information, such as the name and description of your search engine. * Click on the "Create" button. Step 2: Add ChatGPT to the Search Engine ----------------------------------------- * In the "Setup" tab, click on the "Add" button next to "Sites to search". * Enter the following URL: `https://chat.openai.com/` * Click on the "Add" button. Step 3: Configure the Search Engine -------------------------------------- * In the "Setup" tab, click on the "Edit" button next to "Search engine keywords". * Add the following keywords: `ChatGPT` * Click on the "Save" button. Step 4: Get the Search Engine Code ------------------------------------- * In the "Setup" tab, click on the "Get code" button. * Copy the HTML code provided. Step 5: Add the Search Engine to Your Browser ------------------------------------------------ * Open your browser and go to the "Settings" or "Options" page. * Look for the "Search engine" or "Default search engine" option. * Click on the "Add" or "Manage search engines" button. * Paste the HTML code you copied earlier. * Click on the "Add" or "Save" button. You're Done! =============== Now, whenever you search on Google, ChatGPT will be included in the search results. You can also use the custom search engine URL provided by Google to search directly.

290.25 M
Luma Dream Machine
View Detail

Luma Dream Machine

Luma Dream Machine

Dream Machine is an AI model that generates high-quality, realistic videos quickly from text and images using Luma AI.

3.25 M