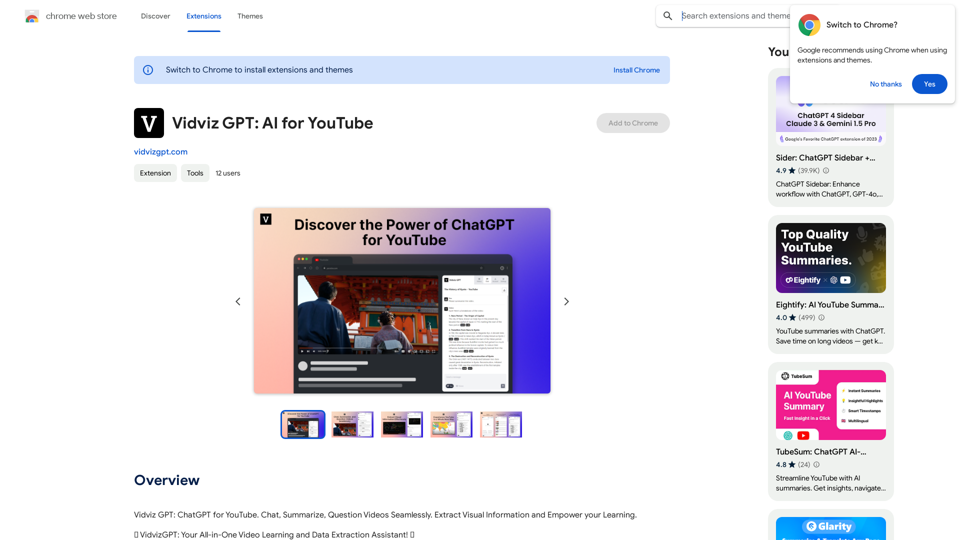
Vidviz GPT is an AI-powered Chrome extension designed to enhance video experiences and boost productivity. It caters to students, data enthusiasts, and anyone seeking to learn from, extract information from, and engage with video content more effectively. The extension leverages advanced AI models to provide features such as video summarization, real-time chat with videos, and visual information extraction.
Vidviz GPT: AI for YouTube Vidviz GPT is an AI-powered tool designed to help you create amazing YouTube videos.
Vidviz GPT: ChatGPT for YouTube. Chat, Summarize, Question Videos Seamlessly. Extract Visual Information and Empower Your Learning.
Introduction
Feature
Chat with Videos
Engage in real-time conversations with YouTube videos using AI. Ask questions, share insights, and interact with video content in a novel way.
Powered by Leading AI Models
Utilizes state-of-the-art AI models including ChatGPT 3.5, GPT-4, Claude Instant, Claude 2, and Google Bard for cutting-edge features and insights.
Summarize Videos Automatically
Save time and enhance comprehension by generating quick summaries of lengthy video content.
Question Videos
Dive deeper into video content with targeted questions, extracting valuable insights for better understanding.
Extract Visual Information
Capture and analyze visual information from video screen captures for deeper content understanding.
Track Recent Conversations
Keep a record of recent interactions and conversations with videos for easy reference.
Export Conversation to PDF
Save and share conversations with videos by exporting them to PDF format.
Text-to-Speech Integration
Convert extracted text into audio narration, enhancing accessibility for users.
FAQ
Who can benefit from Vidviz GPT?
Students can enhance their learning experience by interacting with video content more effectively. Data enthusiasts can extract valuable insights and data from videos for research and analysis purposes.
How do I get started with Vidviz GPT?
- Click "Add to Chrome" and pin Vidviz GPT to your toolbar
- Create a new account
- Press the Vidviz Chrome Icon to open the Sidepanel
- Begin using AI-enhanced video learning and data extraction features
What platforms does Vidviz GPT support?
Vidviz GPT works seamlessly with YouTube.
How does Vidviz GPT handle user privacy?
The company prioritizes user privacy and is committed to achieving SOC, GDPR, and ISO compliance.
Is Vidviz GPT free to use?
Yes, Vidviz GPT is free to download and use, with options for premium features available.
Is Vidviz GPT available globally?
Yes, Vidviz GPT is accessible to users worldwide in all countries.
Latest Traffic Insights
Monthly Visits
230.29 M
Bounce Rate
57.13%
Pages Per Visit
2.75
Time on Site(s)
115.68
Global Rank
-
Country Rank
-
Recent Visits
Traffic Sources
- Social Media:0.75%
- Paid Referrals:0.72%
- Email:0.11%
- Referrals:15.23%
- Search Engines:15.35%
- Direct:67.84%
Related Websites

ScreenRedact on the Mac App Store #Description ScreenRedact is a powerful and easy-to-use screenshot editing tool that allows you to quickly and easily remove sensitive information from your screenshots. With its intuitive interface and advanced features, ScreenRedact is the perfect solution for anyone who needs to share screenshots online or with others. #Features * Easy to use: ScreenRedact's intuitive interface makes it easy to get started, even if you're not tech-savvy. * Advanced editing tools: ScreenRedact offers a range of advanced editing tools, including blur, pixelate, and redact, to help you remove sensitive information from your screenshots. * Customizable: ScreenRedact allows you to customize the appearance of your redactions, including the color, opacity, and style. * Support for multiple file formats: ScreenRedact supports a range of file formats, including JPEG, PNG, and TIFF. * Share easily: ScreenRedact makes it easy to share your edited screenshots with others, either by saving them to your computer or sharing them directly to social media or email. #What's New * Improved performance: ScreenRedact is now faster and more efficient, making it easier to edit your screenshots. * New editing tools: ScreenRedact now includes new editing tools, including a magic wand and a lasso tool, to make it even easier to remove sensitive information from your screenshots. * Enhanced customization options: ScreenRedact now offers even more customization options, including the ability to change the color and opacity of your redactions. #Ratings and Reviews * 4.5/5 stars: ScreenRedact has an average rating of 4.5 out of 5 stars on the Mac App Store. * "Easy to use and effective": One reviewer praised ScreenRedact's ease of use and effectiveness, saying "I was able to quickly and easily remove sensitive information from my screenshots." * "A must-have for anyone who shares screenshots online": Another reviewer called ScreenRedact "a must-have for anyone who shares screenshots online," citing its ease of use and advanced features.
ScreenRedact on the Mac App Store #Description ScreenRedact is a powerful and easy-to-use screenshot editing tool that allows you to quickly and easily remove sensitive information from your screenshots. With its intuitive interface and advanced features, ScreenRedact is the perfect solution for anyone who needs to share screenshots online or with others. #Features * Easy to use: ScreenRedact's intuitive interface makes it easy to get started, even if you're not tech-savvy. * Advanced editing tools: ScreenRedact offers a range of advanced editing tools, including blur, pixelate, and redact, to help you remove sensitive information from your screenshots. * Customizable: ScreenRedact allows you to customize the appearance of your redactions, including the color, opacity, and style. * Support for multiple file formats: ScreenRedact supports a range of file formats, including JPEG, PNG, and TIFF. * Share easily: ScreenRedact makes it easy to share your edited screenshots with others, either by saving them to your computer or sharing them directly to social media or email. #What's New * Improved performance: ScreenRedact is now faster and more efficient, making it easier to edit your screenshots. * New editing tools: ScreenRedact now includes new editing tools, including a magic wand and a lasso tool, to make it even easier to remove sensitive information from your screenshots. * Enhanced customization options: ScreenRedact now offers even more customization options, including the ability to change the color and opacity of your redactions. #Ratings and Reviews * 4.5/5 stars: ScreenRedact has an average rating of 4.5 out of 5 stars on the Mac App Store. * "Easy to use and effective": One reviewer praised ScreenRedact's ease of use and effectiveness, saying "I was able to quickly and easily remove sensitive information from my screenshots." * "A must-have for anyone who shares screenshots online": Another reviewer called ScreenRedact "a must-have for anyone who shares screenshots online," citing its ease of use and advanced features.ScreenRedact allows you to remove sensitive text from an image by utilizing Apple's on-device machine learning model, which identifies text within an image and enables you to redact it with ease.
109.17 M

Save ads from TikTok and Facebook Ad Library with one click. Organize them into boards, and quickly gather interesting videos.
230.29 M

FLUX Canny - Advanced AI Tool for Image Generation with Edge Guidance
FLUX Canny - Advanced AI Tool for Image Generation with Edge GuidanceFLUX Canny - A professional edge-guided AI image generation tool. Transform sketches into stunning artwork with precise structural control.
0
![Batch Save ChatGPT to Notion
This is a guide on how to save multiple ChatGPT responses to Notion in a batch.
Tools You'll Need:
* ChatGPT: An AI chatbot that can generate text.
* Notion: A note-taking and project management tool.
* Python: A programming language.
* Requests Library: A Python library for making HTTP requests.
Steps:
1. Get Your Notion API Token:
- Go to your Notion workspace settings.
- Navigate to the "Integrations" tab.
- Click "Create new integration" and choose "API Token".
- Copy your API token.
2. Install Python Libraries:
- Open your terminal or command prompt.
- Type `pip install requests` and press Enter.
3. Write Python Script:
- Create a new Python file (e.g., `save_chatgpt_to_notion.py`).
- Paste the following code into the file, replacing `YOUR_NOTION_API_TOKEN` with your actual token:
```python
import requests
def save_chatgpt_response_to_notion(response, page_id, token):
"""Saves a ChatGPT response to a Notion page."""
url = f"https://api.notion.com/v1/pages/{page_id}/children"
headers = {"Authorization": f"Bearer {token}"}
data = {
"parent": {
"page_id": page_id
},
"properties": {
"title": {
"title": [
{
"text": {
"content": "ChatGPT Response"
}
}
]
},
"content": {
"rich_text": [
{
"text": {
"content": response
}
}
]
}
}
}
response = requests.post(url, headers=headers, json=data)
print(response.status_code)
Example usage
page_id = "YOUR_NOTION_PAGE_ID"
token = "YOUR_NOTION_API_TOKEN"
Get ChatGPT responses (replace with your actual ChatGPT interaction)
chatgpt_responses = [
"This is the first ChatGPT response.",
"This is the second ChatGPT response.",
"This is the third ChatGPT response."
]
Save each response to Notion
for response in chatgpt_responses:
save_chatgpt_response_to_notion(response, page_id, token)
```
4. Run the Script:
- In your terminal, navigate to the directory where you saved the Python file.
- Type `python save_chatgpt_to_notion.py` and press Enter.
5. Check Notion:
- Open your Notion workspace and go to the page specified by `page_id`.
- You should see your ChatGPT responses saved as separate blocks.
Batch Save ChatGPT to Notion
This is a guide on how to save multiple ChatGPT responses to Notion in a batch.
Tools You'll Need:
* ChatGPT: An AI chatbot that can generate text.
* Notion: A note-taking and project management tool.
* Python: A programming language.
* Requests Library: A Python library for making HTTP requests.
Steps:
1. Get Your Notion API Token:
- Go to your Notion workspace settings.
- Navigate to the "Integrations" tab.
- Click "Create new integration" and choose "API Token".
- Copy your API token.
2. Install Python Libraries:
- Open your terminal or command prompt.
- Type `pip install requests` and press Enter.
3. Write Python Script:
- Create a new Python file (e.g., `save_chatgpt_to_notion.py`).
- Paste the following code into the file, replacing `YOUR_NOTION_API_TOKEN` with your actual token:
```python
import requests
def save_chatgpt_response_to_notion(response, page_id, token):
"""Saves a ChatGPT response to a Notion page."""
url = f"https://api.notion.com/v1/pages/{page_id}/children"
headers = {"Authorization": f"Bearer {token}"}
data = {
"parent": {
"page_id": page_id
},
"properties": {
"title": {
"title": [
{
"text": {
"content": "ChatGPT Response"
}
}
]
},
"content": {
"rich_text": [
{
"text": {
"content": response
}
}
]
}
}
}
response = requests.post(url, headers=headers, json=data)
print(response.status_code)
Example usage
page_id = "YOUR_NOTION_PAGE_ID"
token = "YOUR_NOTION_API_TOKEN"
Get ChatGPT responses (replace with your actual ChatGPT interaction)
chatgpt_responses = [
"This is the first ChatGPT response.",
"This is the second ChatGPT response.",
"This is the third ChatGPT response."
]
Save each response to Notion
for response in chatgpt_responses:
save_chatgpt_response_to_notion(response, page_id, token)
```
4. Run the Script:
- In your terminal, navigate to the directory where you saved the Python file.
- Type `python save_chatgpt_to_notion.py` and press Enter.
5. Check Notion:
- Open your Notion workspace and go to the page specified by `page_id`.
- You should see your ChatGPT responses saved as separate blocks.](https://static.right-ai.com/tools/2024/7/4/chromewebstore-google-com-detail-save-chatgpt-to-notion-da-djefhicmpbpmmlagbgooepmbobdhajgn-thumbnail-1720087209.png)
Batch Save ChatGPT to Notion This is a guide on how to save multiple ChatGPT responses to Notion in a batch. Tools You'll Need: * ChatGPT: An AI chatbot that can generate text. * Notion: A note-taking and project management tool. * Python: A programming language. * Requests Library: A Python library for making HTTP requests. Steps: 1. Get Your Notion API Token: - Go to your Notion workspace settings. - Navigate to the "Integrations" tab. - Click "Create new integration" and choose "API Token". - Copy your API token. 2. Install Python Libraries: - Open your terminal or command prompt. - Type `pip install requests` and press Enter. 3. Write Python Script: - Create a new Python file (e.g., `save_chatgpt_to_notion.py`). - Paste the following code into the file, replacing `YOUR_NOTION_API_TOKEN` with your actual token: ```python import requests def save_chatgpt_response_to_notion(response, page_id, token): """Saves a ChatGPT response to a Notion page.""" url = f"https://api.notion.com/v1/pages/{page_id}/children" headers = {"Authorization": f"Bearer {token}"} data = { "parent": { "page_id": page_id }, "properties": { "title": { "title": [ { "text": { "content": "ChatGPT Response" } } ] }, "content": { "rich_text": [ { "text": { "content": response } } ] } } } response = requests.post(url, headers=headers, json=data) print(response.status_code) Example usage page_id = "YOUR_NOTION_PAGE_ID" token = "YOUR_NOTION_API_TOKEN" Get ChatGPT responses (replace with your actual ChatGPT interaction) chatgpt_responses = [ "This is the first ChatGPT response.", "This is the second ChatGPT response.", "This is the third ChatGPT response." ] Save each response to Notion for response in chatgpt_responses: save_chatgpt_response_to_notion(response, page_id, token) ``` 4. Run the Script: - In your terminal, navigate to the directory where you saved the Python file. - Type `python save_chatgpt_to_notion.py` and press Enter. 5. Check Notion: - Open your Notion workspace and go to the page specified by `page_id`. - You should see your ChatGPT responses saved as separate blocks.
Batch Save ChatGPT to Notion This is a guide on how to save multiple ChatGPT responses to Notion in a batch. Tools You'll Need: * ChatGPT: An AI chatbot that can generate text. * Notion: A note-taking and project management tool. * Python: A programming language. * Requests Library: A Python library for making HTTP requests. Steps: 1. Get Your Notion API Token: - Go to your Notion workspace settings. - Navigate to the "Integrations" tab. - Click "Create new integration" and choose "API Token". - Copy your API token. 2. Install Python Libraries: - Open your terminal or command prompt. - Type `pip install requests` and press Enter. 3. Write Python Script: - Create a new Python file (e.g., `save_chatgpt_to_notion.py`). - Paste the following code into the file, replacing `YOUR_NOTION_API_TOKEN` with your actual token: ```python import requests def save_chatgpt_response_to_notion(response, page_id, token): """Saves a ChatGPT response to a Notion page.""" url = f"https://api.notion.com/v1/pages/{page_id}/children" headers = {"Authorization": f"Bearer {token}"} data = { "parent": { "page_id": page_id }, "properties": { "title": { "title": [ { "text": { "content": "ChatGPT Response" } } ] }, "content": { "rich_text": [ { "text": { "content": response } } ] } } } response = requests.post(url, headers=headers, json=data) print(response.status_code) Example usage page_id = "YOUR_NOTION_PAGE_ID" token = "YOUR_NOTION_API_TOKEN" Get ChatGPT responses (replace with your actual ChatGPT interaction) chatgpt_responses = [ "This is the first ChatGPT response.", "This is the second ChatGPT response.", "This is the third ChatGPT response." ] Save each response to Notion for response in chatgpt_responses: save_chatgpt_response_to_notion(response, page_id, token) ``` 4. Run the Script: - In your terminal, navigate to the directory where you saved the Python file. - Type `python save_chatgpt_to_notion.py` and press Enter. 5. Check Notion: - Open your Notion workspace and go to the page specified by `page_id`. - You should see your ChatGPT responses saved as separate blocks.Save ChatGPT Conversations to Notion with One Click Export your ChatGPT conversations directly to Notion with a single click.
230.29 M

Unleash your creativity with ArtiverseHub's online AI art generator. Enjoy support for multiple platforms including DALL-E (ChatGPT), Leonardo.ai, Stability.ai, and several others.
481

Integrate the power of Gemini AI and Google Translate into your YouTube, making it a great tool for learning foreign languages
230.29 M

Lushair, AI-Powered Hair & Scalp Analysis | Personalized Care Solutions
Lushair, AI-Powered Hair & Scalp Analysis | Personalized Care SolutionsUnlock the secrets of healthy hair with our AI-powered hair and scalp analysis. Discover personalized insights, effective treatments, and embrace a vibrant, confident you. Elevate your hair care journey with cutting-edge technology and expert analysis.
1.33 K