Open-source RightAI Tools Directory
  • Discover AI
  • Submit
  • Startup
  • Blog
Open-source RightAI Tools Directory
Discover the best AI tools of 2025 with the RightAI Tools Directory!

Friend Links

AI Anime GeneratorToolsApp AI

Support

Tap4
Privacy policyTerms & ConditionsContact Us
Loading...
loading...

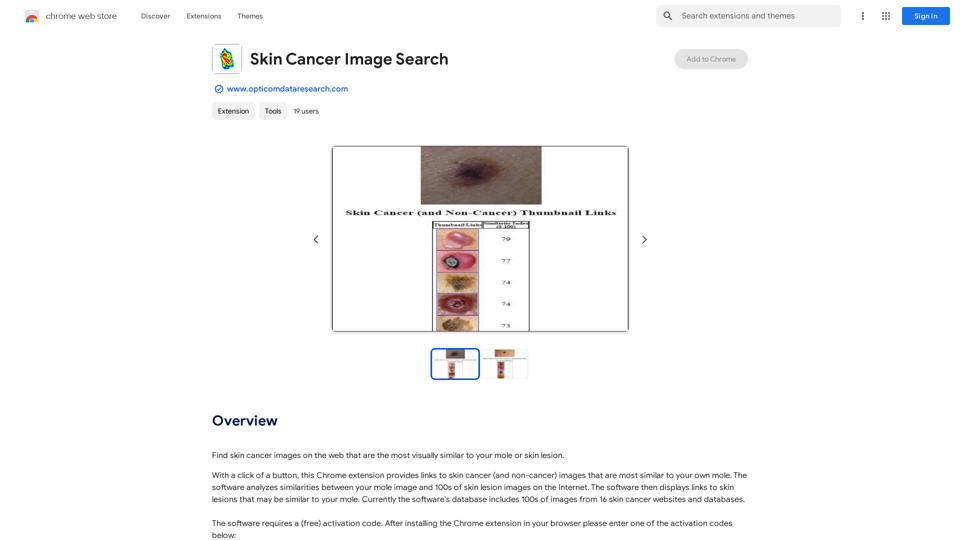
Skin Cancer Image Search

Find pictures of skin cancer online that look most like your mole or skin spot.
Visit Website
Skin Cancer Image Search
Visit Website

Introduction

Skin Cancer Image Search is a Chrome extension developed by Opticom Data Research. It allows users to find visually similar skin cancer images on the web by comparing them to their own moles or skin lesions. With a simple click, the extension provides links to skin cancer (and non-cancer) images that closely resemble the user's own mole, helping with visual comparison and potential early detection.

Feature

Advanced Image Analysis

The software uses sophisticated algorithms to analyze similarities between the user's mole image and hundreds of skin lesion images available on the Internet. This feature enables precise matching and comparison.

Extensive Database

Skin Cancer Image Search features a comprehensive database containing hundreds of images from 16 different skin cancer websites and databases. This extensive collection ensures a wide range of comparisons for users.

Free Activation Process

To access the software's features, users need to obtain a free activation code. This can be easily acquired by installing the Chrome extension and entering one of the provided activation codes.

User-Friendly Interface

The extension is designed for ease of use. Once activated, users can quickly find skin cancer images that visually match their own moles or skin lesions with just a few clicks.

Cost-Free Service

Skin Cancer Image Search is completely free to use. There are no subscriptions or payments required, making it accessible to all users.

Chrome Browser Compatibility

The extension is specifically designed for Chrome browsers, ensuring optimal performance and integration with this popular web browser.

Regular Database Updates

To maintain accuracy and relevance, the database of skin lesion images is continuously updated. This ensures users have access to the most current and comprehensive set of comparison images.

FAQ

What is the purpose of Skin Cancer Image Search?

Skin Cancer Image Search is a Chrome extension designed to help users find skin cancer images on the web that are visually similar to their own moles or skin lesions. It aids in visual comparison and potential early detection of skin cancer.

How does the image analysis work?

The software analyzes similarities between the user's mole image and hundreds of skin lesion images on the Internet using advanced algorithms. It then provides links to the most visually similar skin cancer (and non-cancer) images from its database.

Is there a cost associated with using Skin Cancer Image Search?

No, the Skin Cancer Image Search extension is completely free to use. There are no subscriptions or payments required.

How can I activate the Skin Cancer Image Search extension?

To activate the extension, you need to install it on your Chrome browser and then enter one of the provided free activation codes.

Can I use Skin Cancer Image Search on multiple devices?

Yes, you can use the extension on multiple devices. However, each device will require a separate activation code.

Is the extension available for browsers other than Chrome?

Currently, the Skin Cancer Image Search extension is only available for Chrome browsers.

How often is the image database updated?

The database of skin lesion images is constantly being updated to ensure the most accurate and current results for users.

Latest Traffic Insights

  • Monthly Visits

    290.25 M

  • Bounce Rate

    55.49%

  • Pages Per Visit

    2.84

  • Time on Site(s)

    113.64

  • Global Rank

    -

  • Country Rank

    -

Recent Visits

Traffic Sources

  • Social Media:
    0.68%
  • Paid Referrals:
    0.54%
  • Email:
    0.11%
  • Referrals:
    14.58%
  • Search Engines:
    15.20%
  • Direct:
    68.89%
More Data

Related Websites

It's not possible to directly "save" ChatGPT or DALL路E-3 into Notion. 

ChatGPT and DALL路E-3 are powerful AI models developed by OpenAI. They are not physical files that can be downloaded and stored. 

Think of them like online services you access through an internet connection. You can interact with them, get outputs from them, and even use their outputs in Notion, but you can't "save" the models themselves. 


Let me know if you'd like to explore ways to integrate ChatGPT or DALL路E-3 outputs into your Notion workspace!
View Detail

It's not possible to directly "save" ChatGPT or DALL路E-3 into Notion. ChatGPT and DALL路E-3 are powerful AI models developed by OpenAI. They are not physical files that can be downloaded and stored. Think of them like online services you access through an internet connection. You can interact with them, get outputs from them, and even use their outputs in Notion, but you can't "save" the models themselves. Let me know if you'd like to explore ways to integrate ChatGPT or DALL路E-3 outputs into your Notion workspace!

It's not possible to directly "save" ChatGPT or DALL路E-3 into Notion. ChatGPT and DALL路E-3 are powerful AI models developed by OpenAI. They are not physical files that can be downloaded and stored. Think of them like online services you access through an internet connection. You can interact with them, get outputs from them, and even use their outputs in Notion, but you can't "save" the models themselves. Let me know if you'd like to explore ways to integrate ChatGPT or DALL路E-3 outputs into your Notion workspace!

Save ChatGPT conversations to Notion with one click. Export ChatGPT conversations.

290.25 M
ProfilePro - AI SEO Tool for Google Business Profile SEO
View Detail

ProfilePro - AI SEO Tool for Google Business Profile SEO

ProfilePro - AI SEO Tool for Google Business Profile SEO

Audit Google My Business SEO, automate Google Business Profile SEO tasks, optimize your Google My Business everywhere and outperform competitors with this AI SEO tool without having to spy!

290.25 M
Enhance Image Quality up to 10x and 12K with AI | Improve Image
View Detail

Enhance Image Quality up to 10x and 12K with AI | Improve Image

Enhance Image Quality up to 10x and 12K with AI | Improve Image

Here is the English translation: With AI, enlarge images up to 10 times and 12K resolution in seconds, to improve image quality and make your images sharper and more realistic | Enhance Image

38.31 K
Midjourney API - Automate Midjourney AI Image Generation 

This document outlines how to use the Midjourney API to automate the generation of AI images. 

What is the Midjourney API?

The Midjourney API allows developers to programmatically interact with the powerful Midjourney AI model. This means you can generate images, control various parameters, and integrate Midjourney into your own applications and workflows.

Why Use the Midjourney API?

* Automation: Automate the creation of images for various purposes, such as marketing materials, website content, or research projects.
* Customization: Fine-tune image generation by controlling parameters like aspect ratio, style, and seed values.
* Integration: Seamlessly integrate Midjourney's capabilities into your existing tools and platforms.

Getting Started

1. Sign Up for a Midjourney Account: You'll need a Midjourney account to access the API.

2. Obtain an API Key: Once you have an account, you can generate an API key from your account settings.

3. Choose a Programming Language: The Midjourney API supports various programming languages, including Python, JavaScript, and Go.

4. Install the API Client: Install the appropriate API client library for your chosen language.

5. Start Generating Images: Use the API client to send image generation requests to the Midjourney server.

Example (Python):

```python
import midjourney

Replace with your actual API key
api_key = "YOUR_API_KEY"

Create a Midjourney client
client = midjourney.Client(api_key=api_key)

Generate an image
response = client.create_image(prompt="A cat wearing a hat", num_images=1)

Print the image URL
print(response.images[0].url)
```

Documentation and Resources

For detailed information about the Midjourney API, including available endpoints, parameters, and examples, please refer to the official documentation: [https://docs.midjourney.com/](https://docs.midjourney.com/)
View Detail

Midjourney API - Automate Midjourney AI Image Generation This document outlines how to use the Midjourney API to automate the generation of AI images. What is the Midjourney API? The Midjourney API allows developers to programmatically interact with the powerful Midjourney AI model. This means you can generate images, control various parameters, and integrate Midjourney into your own applications and workflows. Why Use the Midjourney API? * Automation: Automate the creation of images for various purposes, such as marketing materials, website content, or research projects. * Customization: Fine-tune image generation by controlling parameters like aspect ratio, style, and seed values. * Integration: Seamlessly integrate Midjourney's capabilities into your existing tools and platforms. Getting Started 1. Sign Up for a Midjourney Account: You'll need a Midjourney account to access the API. 2. Obtain an API Key: Once you have an account, you can generate an API key from your account settings. 3. Choose a Programming Language: The Midjourney API supports various programming languages, including Python, JavaScript, and Go. 4. Install the API Client: Install the appropriate API client library for your chosen language. 5. Start Generating Images: Use the API client to send image generation requests to the Midjourney server. Example (Python): ```python import midjourney Replace with your actual API key api_key = "YOUR_API_KEY" Create a Midjourney client client = midjourney.Client(api_key=api_key) Generate an image response = client.create_image(prompt="A cat wearing a hat", num_images=1) Print the image URL print(response.images[0].url) ``` Documentation and Resources For detailed information about the Midjourney API, including available endpoints, parameters, and examples, please refer to the official documentation: [https://docs.midjourney.com/](https://docs.midjourney.com/)

Midjourney API - Automate Midjourney AI Image Generation This document outlines how to use the Midjourney API to automate the generation of AI images. What is the Midjourney API? The Midjourney API allows developers to programmatically interact with the powerful Midjourney AI model. This means you can generate images, control various parameters, and integrate Midjourney into your own applications and workflows. Why Use the Midjourney API? * Automation: Automate the creation of images for various purposes, such as marketing materials, website content, or research projects. * Customization: Fine-tune image generation by controlling parameters like aspect ratio, style, and seed values. * Integration: Seamlessly integrate Midjourney's capabilities into your existing tools and platforms. Getting Started 1. Sign Up for a Midjourney Account: You'll need a Midjourney account to access the API. 2. Obtain an API Key: Once you have an account, you can generate an API key from your account settings. 3. Choose a Programming Language: The Midjourney API supports various programming languages, including Python, JavaScript, and Go. 4. Install the API Client: Install the appropriate API client library for your chosen language. 5. Start Generating Images: Use the API client to send image generation requests to the Midjourney server. Example (Python): ```python import midjourney Replace with your actual API key api_key = "YOUR_API_KEY" Create a Midjourney client client = midjourney.Client(api_key=api_key) Generate an image response = client.create_image(prompt="A cat wearing a hat", num_images=1) Print the image URL print(response.images[0].url) ``` Documentation and Resources For detailed information about the Midjourney API, including available endpoints, parameters, and examples, please refer to the official documentation: [https://docs.midjourney.com/](https://docs.midjourney.com/)

Easily integrate Midjourney AI into your apps using the Midjourney API. Start creating AI images automatically today!

14.36 K
Sanket's OpenAI Search
View Detail

Sanket's OpenAI Search

Sanket's OpenAI Search

Chrome Extension for OpenAI Search This is a Chrome extension that integrates OpenAI's powerful search capabilities directly into your browser. Features: * Seamless Search: Access OpenAI's search results directly from your address bar or by clicking a dedicated button. * Contextual Understanding: The extension leverages OpenAI's advanced language models to understand the context of your search queries, delivering more relevant and insightful results. * Summarization and Insights: Get concise summaries and key takeaways from search results, saving you time and effort. * Customizable Settings: Tailor your search experience with options to adjust parameters like temperature and top_p for fine-tuned results. Benefits: * Enhanced Research: Uncover deeper insights and explore information more effectively. * Improved Productivity: Quickly find the information you need and streamline your workflow. * New Ways to Explore: Discover unexpected connections and gain a broader understanding of topics.

290.25 M
Simplified Chrome Extension

This is a basic Chrome extension designed to be easy to understand and modify. 

Manifest File (manifest.json):

```json
{
  "manifest_version": 3,
  "name": "Simplified Extension",
  "version": "1.0",
  "description": "A simple Chrome extension example.",
  "permissions": [
    "activeTab"
  ],
  "action": {
    "default_popup": "popup.html"
  }
}
```

Popup HTML (popup.html):

```html
<!DOCTYPE html>
<html>
<head>
  <title>Simplified Extension</title>
</head>
<body>
  <h1>Hello from the extension!</h1>
  <p>This is a simple popup.</p>
</body>
</html>
```

Explanation:

* manifest.json: This file tells Chrome what your extension does.
    * `manifest_version`: Specifies the version of the manifest file format.
    * `name`: The name of your extension.
    * `version`: The current version of your extension.
    * `description`: A brief description of your extension.
    * `permissions`: Lists the permissions your extension needs to function. Here, it needs access to the active tab.
    * `action`: Defines the popup that appears when the extension icon is clicked.

* popup.html: This file contains the HTML code for the popup window.

How it works:

1. When you install the extension, Chrome reads the `manifest.json` file.
2. When you click the extension icon, Chrome opens the `popup.html` file in a new window.
3. The popup displays the "Hello from the extension!" message.
View Detail

Simplified Chrome Extension This is a basic Chrome extension designed to be easy to understand and modify. Manifest File (manifest.json): ```json { "manifest_version": 3, "name": "Simplified Extension", "version": "1.0", "description": "A simple Chrome extension example.", "permissions": [ "activeTab" ], "action": { "default_popup": "popup.html" } } ``` Popup HTML (popup.html): ```html <!DOCTYPE html> <html> <head> <title>Simplified Extension</title> </head> <body> <h1>Hello from the extension!</h1> <p>This is a simple popup.</p> </body> </html> ``` Explanation: * manifest.json: This file tells Chrome what your extension does. * `manifest_version`: Specifies the version of the manifest file format. * `name`: The name of your extension. * `version`: The current version of your extension. * `description`: A brief description of your extension. * `permissions`: Lists the permissions your extension needs to function. Here, it needs access to the active tab. * `action`: Defines the popup that appears when the extension icon is clicked. * popup.html: This file contains the HTML code for the popup window. How it works: 1. When you install the extension, Chrome reads the `manifest.json` file. 2. When you click the extension icon, Chrome opens the `popup.html` file in a new window. 3. The popup displays the "Hello from the extension!" message.

Simplified Chrome Extension This is a basic Chrome extension designed to be easy to understand and modify. Manifest File (manifest.json): ```json { "manifest_version": 3, "name": "Simplified Extension", "version": "1.0", "description": "A simple Chrome extension example.", "permissions": [ "activeTab" ], "action": { "default_popup": "popup.html" } } ``` Popup HTML (popup.html): ```html <!DOCTYPE html> <html> <head> <title>Simplified Extension</title> </head> <body> <h1>Hello from the extension!</h1> <p>This is a simple popup.</p> </body> </html> ``` Explanation: * manifest.json: This file tells Chrome what your extension does. * `manifest_version`: Specifies the version of the manifest file format. * `name`: The name of your extension. * `version`: The current version of your extension. * `description`: A brief description of your extension. * `permissions`: Lists the permissions your extension needs to function. Here, it needs access to the active tab. * `action`: Defines the popup that appears when the extension icon is clicked. * popup.html: This file contains the HTML code for the popup window. How it works: 1. When you install the extension, Chrome reads the `manifest.json` file. 2. When you click the extension icon, Chrome opens the `popup.html` file in a new window. 3. The popup displays the "Hello from the extension!" message.

Design & Collaborate Marketing made easy #Simplified

290.25 M
Am I Getting Fatter Quiz - Find out with AI
View Detail

Am I Getting Fatter Quiz - Find out with AI

Am I Getting Fatter Quiz - Find out with AI

Take our AI 'Am I Getting Fatter Quiz' to discover if you're fatter than you think. Find out if you need to lose weight, change your lifestyle or if you're on the right track.

1.02 K
ChatGPT on Google
View Detail

ChatGPT on Google

ChatGPT on Google

Use Google to access ChatGPT and see the AI chatbot's answers next to regular search results.

290.25 M