Open-source RightAI Tools Directory
  • Discover AI
  • Submit
  • Startup
  • Blog
Open-source RightAI Tools Directory
Discover the best AI tools of 2025 with the RightAI Tools Directory!

Friend Links

AI Anime GeneratorToolsApp AI

Support

Tap4
Privacy policyTerms & ConditionsContact Us
Loading...
loading...

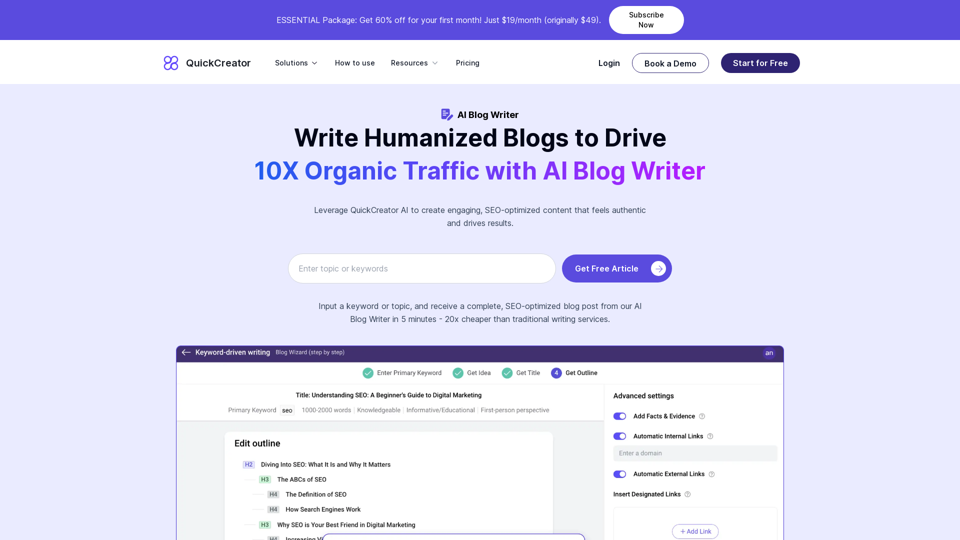
AI Blog Writer - Create Humanized, SEO-Optimized Blogs | QuickCreator

Elevate your content with AI Blog Writer by QuickCreator. Generate engaging, human-like blog posts using real-time data and verified citations. Try it for Free.
Visit Website
AI Blog Writer - Create Humanized, SEO-Optimized Blogs | QuickCreator
Visit Website

Introduction

AI Blog Writer is an innovative platform that uses artificial intelligence to create high-quality, SEO-optimized blog posts in just 5 minutes. It produces engaging, humanized content that drives 10X organic traffic and resonates with the audience. The platform offers a range of features to streamline content creation, from analyzing high-ranking articles for ideas to generating compelling titles and descriptions.

Feature

Analyze High-Ranking Articles for Ideas

AI Blog Writer searches the web for top-performing articles in your niche, extracting writing ideas that align with search intent. This ensures relevant and competitive content.

Generate High-Conversion Titles and Descriptions

The AI learns from high-ranking content to create compelling titles and descriptions, maximizing engagement and click-through rates.

AI-Powered Research with Real-time Data

The platform scans the web in real-time, gathering the latest data, trends, and insights related to your topic, ensuring fresh and relevant content.

Create High-Quality Articles with Brand Voice

Advanced algorithms tailor the article to match your brand's unique voice, making the content feel authentic and unique.

Crafting Humanized Content

The AI synthesizes gathered information and your brand voice into a coherent, engaging article that reads as if written by a human, enhancing relatability and engagement.

Multilingual Support

AI Blog Writer supports writing in over 28 languages, catering to a global audience.

SEO Optimization

The platform includes built-in SEO keyword and content quality scoring to optimize your content for search engines.

Flexible Content Creation

There's no limit to article length, and AI Blog Writer can create various types of content, including blog posts and product descriptions.

Additional Features

  • Internal link insertion
  • Automatic image insertion
  • Blog hosting with custom domain support
  • Integration with WordPress, Shopify, and Strapi

FAQ

How do I use AI Blog Writer?

Input a keyword or topic, and receive a complete, SEO-optimized blog post in 5 minutes.

Is AI Blog Writer free to use?

No, but you can get 3 free articles. The platform offers a trial period of 3 days.

Can articles written by AI Blog Writer pass AI detection?

Yes, AI Blog Writer's content is designed to pass AI detection.

What is the pricing for AI Blog Writer?

There's a special offer of 60% off for the first month, priced at $19/month (originally $49).

Can I modify the outline during the writing process?

Yes, you can modify the outline during the writing process.

Does AI Blog Writer support blog hosting and custom domains?

Yes, AI Blog Writer supports blog hosting and custom domains.

Latest Traffic Insights

  • Monthly Visits

    195.62 K

  • Bounce Rate

    46.54%

  • Pages Per Visit

    2.62

  • Time on Site(s)

    150.92

  • Global Rank

    224215

  • Country Rank

    India 87791

Recent Visits

Traffic Sources

  • Social Media:
    2.46%
  • Paid Referrals:
    0.53%
  • Email:
    0.09%
  • Referrals:
    8.53%
  • Search Engines:
    53.97%
  • Direct:
    34.40%
More Data

Related Websites

Writer - Create high-quality articles in minutes.
View Detail

Writer - Create high-quality articles in minutes.

Writer - Create high-quality articles in minutes.

Create high-quality articles in minutes using an AI-powered writing assistant.

290.25 M
Aiapp.gg Web Extension
View Detail

Aiapp.gg Web Extension

Aiapp.gg Web Extension

This plugin, part of aiapp.gg, enhances your online writing.

290.25 M
LearnHouse - The modern Open source learning platform for everyone.
View Detail

LearnHouse - The modern Open source learning platform for everyone.

LearnHouse - The modern Open source learning platform for everyone.

LearnHouse is an open source platform that makes it easy for anyone to provide world-class educational content and it offers a variety of content types : Dynamic Pages, Videos, Documents & more.

3.28 K
Converting JPG Images to Text

Converting a JPG image to text is a process known as Optical Character Recognition (OCR). This technology enables you to extract text from images, scanned documents, and photos. Here's how to do it:

Method 1: Online OCR Tools

You can use online OCR tools to convert JPG images to text. Here are the steps:

1. Upload your JPG image: Go to an online OCR tool website, such as Online OCR Tools or OCR.space, and upload your JPG image.
2. Select the language: Choose the language of the text in your image.
3. Click on "Convert": The tool will convert the image to text.
4. Download the text: You can download the extracted text as a Word document, PDF, or plain text file.

Method 2: Google Drive

You can also use Google Drive to convert JPG images to text. Here's how:

1. Upload your JPG image: Upload your JPG image to Google Drive.
2. Right-click on the image: Right-click on the uploaded image and select "Open with" > "Google Docs".
3. The image will be converted: Google Docs will automatically convert the image to text.
4. Edit and download: You can edit the extracted text and download it as a Word document or PDF.

Method 3: Adobe Acrobat

If you have Adobe Acrobat installed on your computer, you can use it to convert JPG images to text. Here's how:

1. Open Adobe Acrobat: Open Adobe Acrobat on your computer.
2. Create a new document: Create a new document and click on "Tools" > "Recognize Text".
3. Select the image: Select the JPG image you want to convert.
4. Click on "Recognize": Adobe Acrobat will convert the image to text.
5. Edit and save: You can edit the extracted text and save it as a Word document or PDF.

These are the three methods to convert JPG images to text. Choose the method that works best for you!
View Detail

Converting JPG Images to Text Converting a JPG image to text is a process known as Optical Character Recognition (OCR). This technology enables you to extract text from images, scanned documents, and photos. Here's how to do it: Method 1: Online OCR Tools You can use online OCR tools to convert JPG images to text. Here are the steps: 1. Upload your JPG image: Go to an online OCR tool website, such as Online OCR Tools or OCR.space, and upload your JPG image. 2. Select the language: Choose the language of the text in your image. 3. Click on "Convert": The tool will convert the image to text. 4. Download the text: You can download the extracted text as a Word document, PDF, or plain text file. Method 2: Google Drive You can also use Google Drive to convert JPG images to text. Here's how: 1. Upload your JPG image: Upload your JPG image to Google Drive. 2. Right-click on the image: Right-click on the uploaded image and select "Open with" > "Google Docs". 3. The image will be converted: Google Docs will automatically convert the image to text. 4. Edit and download: You can edit the extracted text and download it as a Word document or PDF. Method 3: Adobe Acrobat If you have Adobe Acrobat installed on your computer, you can use it to convert JPG images to text. Here's how: 1. Open Adobe Acrobat: Open Adobe Acrobat on your computer. 2. Create a new document: Create a new document and click on "Tools" > "Recognize Text". 3. Select the image: Select the JPG image you want to convert. 4. Click on "Recognize": Adobe Acrobat will convert the image to text. 5. Edit and save: You can edit the extracted text and save it as a Word document or PDF. These are the three methods to convert JPG images to text. Choose the method that works best for you!

Converting JPG Images to Text Converting a JPG image to text is a process known as Optical Character Recognition (OCR). This technology enables you to extract text from images, scanned documents, and photos. Here's how to do it: Method 1: Online OCR Tools You can use online OCR tools to convert JPG images to text. Here are the steps: 1. Upload your JPG image: Go to an online OCR tool website, such as Online OCR Tools or OCR.space, and upload your JPG image. 2. Select the language: Choose the language of the text in your image. 3. Click on "Convert": The tool will convert the image to text. 4. Download the text: You can download the extracted text as a Word document, PDF, or plain text file. Method 2: Google Drive You can also use Google Drive to convert JPG images to text. Here's how: 1. Upload your JPG image: Upload your JPG image to Google Drive. 2. Right-click on the image: Right-click on the uploaded image and select "Open with" > "Google Docs". 3. The image will be converted: Google Docs will automatically convert the image to text. 4. Edit and download: You can edit the extracted text and download it as a Word document or PDF. Method 3: Adobe Acrobat If you have Adobe Acrobat installed on your computer, you can use it to convert JPG images to text. Here's how: 1. Open Adobe Acrobat: Open Adobe Acrobat on your computer. 2. Create a new document: Create a new document and click on "Tools" > "Recognize Text". 3. Select the image: Select the JPG image you want to convert. 4. Click on "Recognize": Adobe Acrobat will convert the image to text. 5. Edit and save: You can edit the extracted text and save it as a Word document or PDF. These are the three methods to convert JPG images to text. Choose the method that works best for you!

It is an online tool that uses Optical Character Recognition (OCR) to make it possible to extract text from images in JPG format.

290.25 M
Get ChatGPT for Free with Google

You can now access ChatGPT, a powerful language model, for free with Google. Here's how:

Method 1: Google Colab

* Open Google Colab ([colab.research.google.com](http://colab.research.google.com))
* Create a new notebook
* Install the `transformers` library by running `!pip install transformers`
* Import the `transformers` library and load the ChatGPT model using `from transformers import AutoModelForCausalLM, AutoTokenizer; model = AutoModelForCausalLM.from_pretrained('chatgpt'); tokenizer = AutoTokenizer.from_pretrained('chatgpt')`
* Use the model to generate text using `input_text = "Your input here"; inputs = tokenizer.encode_plus(input_text, return_tensors='pt', max_length=1024, padding='max_length', truncation=True); output = model(inputs['input_ids'], attention_mask=inputs['attention_mask']); print(tokenizer.decode(output.logits[0], skip_special_tokens=True))`

Method 2: Google Apps Script

* Open Google Apps Script ([script.google.com](http://script.google.com))
* Create a new project
* Install the `transformers` library by running `npm install transformers`
* Import the `transformers` library and load the ChatGPT model using `const { AutoModelForCausalLM, AutoTokenizer } = require('transformers'); const model = new AutoModelForCausalLM('chatgpt'); const tokenizer = new AutoTokenizer('chatgpt');`
* Use the model to generate text using `const inputText = "Your input here"; const inputs = tokenizer.encodePlus(inputText, { return_tensors: 'pt', max_length: 1024, padding: 'max_length', truncation: true }); const output = model(inputs.inputIds, inputs.attentionMask); console.log(tokenizer.decode(output.logits[0], { skipSpecialTokens: true }));`

Note: These methods require some technical knowledge and may have limitations compared to the original ChatGPT model.
View Detail

Get ChatGPT for Free with Google You can now access ChatGPT, a powerful language model, for free with Google. Here's how: Method 1: Google Colab * Open Google Colab ([colab.research.google.com](http://colab.research.google.com)) * Create a new notebook * Install the `transformers` library by running `!pip install transformers` * Import the `transformers` library and load the ChatGPT model using `from transformers import AutoModelForCausalLM, AutoTokenizer; model = AutoModelForCausalLM.from_pretrained('chatgpt'); tokenizer = AutoTokenizer.from_pretrained('chatgpt')` * Use the model to generate text using `input_text = "Your input here"; inputs = tokenizer.encode_plus(input_text, return_tensors='pt', max_length=1024, padding='max_length', truncation=True); output = model(inputs['input_ids'], attention_mask=inputs['attention_mask']); print(tokenizer.decode(output.logits[0], skip_special_tokens=True))` Method 2: Google Apps Script * Open Google Apps Script ([script.google.com](http://script.google.com)) * Create a new project * Install the `transformers` library by running `npm install transformers` * Import the `transformers` library and load the ChatGPT model using `const { AutoModelForCausalLM, AutoTokenizer } = require('transformers'); const model = new AutoModelForCausalLM('chatgpt'); const tokenizer = new AutoTokenizer('chatgpt');` * Use the model to generate text using `const inputText = "Your input here"; const inputs = tokenizer.encodePlus(inputText, { return_tensors: 'pt', max_length: 1024, padding: 'max_length', truncation: true }); const output = model(inputs.inputIds, inputs.attentionMask); console.log(tokenizer.decode(output.logits[0], { skipSpecialTokens: true }));` Note: These methods require some technical knowledge and may have limitations compared to the original ChatGPT model.

Get ChatGPT for Free with Google You can now access ChatGPT, a powerful language model, for free with Google. Here's how: Method 1: Google Colab * Open Google Colab ([colab.research.google.com](http://colab.research.google.com)) * Create a new notebook * Install the `transformers` library by running `!pip install transformers` * Import the `transformers` library and load the ChatGPT model using `from transformers import AutoModelForCausalLM, AutoTokenizer; model = AutoModelForCausalLM.from_pretrained('chatgpt'); tokenizer = AutoTokenizer.from_pretrained('chatgpt')` * Use the model to generate text using `input_text = "Your input here"; inputs = tokenizer.encode_plus(input_text, return_tensors='pt', max_length=1024, padding='max_length', truncation=True); output = model(inputs['input_ids'], attention_mask=inputs['attention_mask']); print(tokenizer.decode(output.logits[0], skip_special_tokens=True))` Method 2: Google Apps Script * Open Google Apps Script ([script.google.com](http://script.google.com)) * Create a new project * Install the `transformers` library by running `npm install transformers` * Import the `transformers` library and load the ChatGPT model using `const { AutoModelForCausalLM, AutoTokenizer } = require('transformers'); const model = new AutoModelForCausalLM('chatgpt'); const tokenizer = new AutoTokenizer('chatgpt');` * Use the model to generate text using `const inputText = "Your input here"; const inputs = tokenizer.encodePlus(inputText, { return_tensors: 'pt', max_length: 1024, padding: 'max_length', truncation: true }); const output = model(inputs.inputIds, inputs.attentionMask); console.log(tokenizer.decode(output.logits[0], { skipSpecialTokens: true }));` Note: These methods require some technical knowledge and may have limitations compared to the original ChatGPT model.

How to Add ChatGPT to All Google Searches ===================================================== Step 1: Create a Custom Search Engine -------------------------------------- * Go to the [Google Custom Search Engine](https://cse.google.com/) website and sign in with your Google account. * Click on the "New Search Engine" button. * Fill in the required information, such as the name and description of your search engine. * Click on the "Create" button. Step 2: Add ChatGPT to the Search Engine ----------------------------------------- * In the "Setup" tab, click on the "Add" button next to "Sites to search". * Enter the following URL: `https://chat.openai.com/` * Click on the "Add" button. Step 3: Configure the Search Engine -------------------------------------- * In the "Setup" tab, click on the "Edit" button next to "Search engine keywords". * Add the following keywords: `ChatGPT` * Click on the "Save" button. Step 4: Get the Search Engine Code ------------------------------------- * In the "Setup" tab, click on the "Get code" button. * Copy the HTML code provided. Step 5: Add the Search Engine to Your Browser ------------------------------------------------ * Open your browser and go to the "Settings" or "Options" page. * Look for the "Search engine" or "Default search engine" option. * Click on the "Add" or "Manage search engines" button. * Paste the HTML code you copied earlier. * Click on the "Add" or "Save" button. You're Done! =============== Now, whenever you search on Google, ChatGPT will be included in the search results. You can also use the custom search engine URL provided by Google to search directly.

290.25 M
CurseCut - Automatic AI Profanity Removal for Video and Audio
View Detail

CurseCut - Automatic AI Profanity Removal for Video and Audio

CurseCut - Automatic AI Profanity Removal for Video and Audio

Effortlessly remove profanity from your video audio using our advanced AI technology. Try CurseCut today for clean, professional content.

13.35 K
The all-in-one Audio AI platform. The ultimate solution for Audio Transcription, Speech-To-Text, Audio Pen, Text-To-Speech, Video Dubbing, Live Stream Captioning.
View Detail

The all-in-one Audio AI platform. The ultimate solution for Audio Transcription, Speech-To-Text, Audio Pen, Text-To-Speech, Video Dubbing, Live Stream Captioning.

The all-in-one Audio AI platform. The ultimate solution for Audio Transcription, Speech-To-Text, Audio Pen, Text-To-Speech, Video Dubbing, Live Stream Captioning.

The all-in-one Audio AI platform. The ultimate solution for Audio Transcription, Speech-To-Text, Audio Pen, Text-To-Speech, Video Dubbing, Live Stream Caption

0
Best AI Job Application Bot 2024 | Webs-Automation

This AI-powered job application bot is designed to simplify and streamline the job application process for both job seekers and employers. With its advanced automation capabilities, this bot can efficiently search for job openings, tailor resumes and cover letters, and even submit applications on behalf of the job seeker.
View Detail

Best AI Job Application Bot 2024 | Webs-Automation This AI-powered job application bot is designed to simplify and streamline the job application process for both job seekers and employers. With its advanced automation capabilities, this bot can efficiently search for job openings, tailor resumes and cover letters, and even submit applications on behalf of the job seeker.

Best AI Job Application Bot 2024 | Webs-Automation This AI-powered job application bot is designed to simplify and streamline the job application process for both job seekers and employers. With its advanced automation capabilities, this bot can efficiently search for job openings, tailor resumes and cover letters, and even submit applications on behalf of the job seeker.

Enhance Your Job Search with the Ultimate AI Job Application Bot! Simplify the Application Process and Boost Your Prospects with Our Top Job Application Bot.

4.08 K