Open-source RightAI Tools Directory
  • Discover AI
  • Submit
  • Startup
  • Blog
Open-source RightAI Tools Directory
Discover the best AI tools of 2025 with the RightAI Tools Directory!

Friend Links

AI Anime GeneratorToolsApp AI

Support

Tap4
Privacy policyTerms & ConditionsContact Us
Loading...
loading...

Glimpse - AI Gmail Assistant powered by ChatGPT4
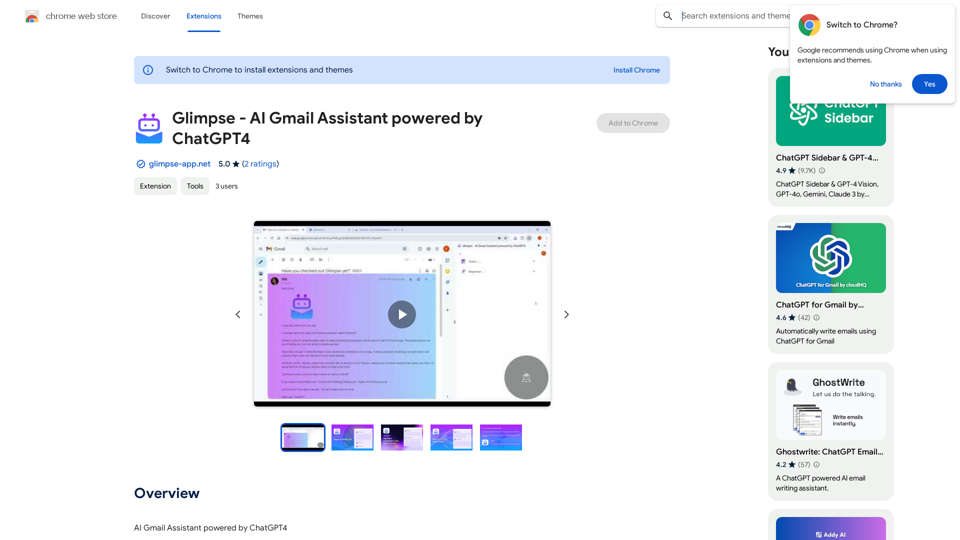
AI Gmail Assistant powered by ChatGPT4
Visit Website
Glimpse - AI Gmail Assistant powered by ChatGPT4
Visit Website

Introduction

Glimpse is an AI-powered Gmail assistant that leverages ChatGPT4 technology to help users manage their email overload. It offers features such as email summarization, action and response highlighting, and question-answer matching within email threads. Designed to save time and improve email management efficiency, Glimpse is a free Chrome extension compatible with Gmail.

Feature

Email Summarization

Glimpse provides concise summaries of email content, allowing users to quickly grasp the main points without reading through lengthy messages. This feature significantly reduces the time spent on email management.

Action and Response Highlighting

The extension automatically identifies and highlights proposed actions and responses within email threads. This feature ensures that users don't miss important tasks or required responses, improving overall productivity and responsiveness.

Question and Answer Matching

Glimpse matches questions with their corresponding answers in email threads. This functionality helps users quickly identify which questions still need their attention, facilitating more efficient communication.

Easy Installation and Use

Glimpse can be easily installed as a Chrome browser extension. Once installed, it seamlessly integrates with Gmail, providing instant assistance without complicated setup processes.

Free to Use

As a free extension, Glimpse offers its powerful email management features without any subscription fees or payments, making it accessible to all Gmail users.

FAQ

Is Glimpse compatible with other email clients?

Currently, Glimpse is only compatible with Gmail. However, the developers are working on expanding support to other email clients in the future.

How do I install Glimpse?

To install Glimpse, simply navigate to the Chrome Web Store and click the "Add to Chrome" button on the Glimpse extension page.

Can Glimpse handle long email threads?

Yes, Glimpse is designed to handle emails of various lengths. It's particularly useful for summarizing long emails, allowing users to focus on the most important information quickly.

Is my email data secure when using Glimpse?

While the website content doesn't explicitly mention security measures, it's important to note that as an AI-powered tool, Glimpse likely processes email data. Users concerned about privacy should review the extension's privacy policy and terms of service before installation.

Latest Traffic Insights

  • Monthly Visits

    193.90 M

  • Bounce Rate

    56.27%

  • Pages Per Visit

    2.71

  • Time on Site(s)

    115.91

  • Global Rank

    -

  • Country Rank

    -

Recent Visits

Traffic Sources

  • Social Media:
    0.48%
  • Paid Referrals:
    0.55%
  • Email:
    0.15%
  • Referrals:
    12.81%
  • Search Engines:
    16.21%
  • Direct:
    69.81%
More Data

Related Websites

Grey Cat - Randomizer
View Detail

Grey Cat - Randomizer

Grey Cat - Randomizer

This extension randomly selects a specific number of items from a given list.

193.90 M
Get ChatGPT for Free with Google

You can now access ChatGPT, a powerful language model, for free with Google. Here's how:

Method 1: Google Colab

* Open Google Colab ([colab.research.google.com](http://colab.research.google.com))
* Create a new notebook
* Install the `transformers` library by running `!pip install transformers`
* Import the `transformers` library and load the ChatGPT model using `from transformers import AutoModelForCausalLM, AutoTokenizer; model = AutoModelForCausalLM.from_pretrained('chatgpt'); tokenizer = AutoTokenizer.from_pretrained('chatgpt')`
* Use the model to generate text using `input_text = "Your input here"; inputs = tokenizer.encode_plus(input_text, return_tensors='pt', max_length=1024, padding='max_length', truncation=True); output = model(inputs['input_ids'], attention_mask=inputs['attention_mask']); print(tokenizer.decode(output.logits[0], skip_special_tokens=True))`

Method 2: Google Apps Script

* Open Google Apps Script ([script.google.com](http://script.google.com))
* Create a new project
* Install the `transformers` library by running `npm install transformers`
* Import the `transformers` library and load the ChatGPT model using `const { AutoModelForCausalLM, AutoTokenizer } = require('transformers'); const model = new AutoModelForCausalLM('chatgpt'); const tokenizer = new AutoTokenizer('chatgpt');`
* Use the model to generate text using `const inputText = "Your input here"; const inputs = tokenizer.encodePlus(inputText, { return_tensors: 'pt', max_length: 1024, padding: 'max_length', truncation: true }); const output = model(inputs.inputIds, inputs.attentionMask); console.log(tokenizer.decode(output.logits[0], { skipSpecialTokens: true }));`

Note: These methods require some technical knowledge and may have limitations compared to the original ChatGPT model.
View Detail

Get ChatGPT for Free with Google You can now access ChatGPT, a powerful language model, for free with Google. Here's how: Method 1: Google Colab * Open Google Colab ([colab.research.google.com](http://colab.research.google.com)) * Create a new notebook * Install the `transformers` library by running `!pip install transformers` * Import the `transformers` library and load the ChatGPT model using `from transformers import AutoModelForCausalLM, AutoTokenizer; model = AutoModelForCausalLM.from_pretrained('chatgpt'); tokenizer = AutoTokenizer.from_pretrained('chatgpt')` * Use the model to generate text using `input_text = "Your input here"; inputs = tokenizer.encode_plus(input_text, return_tensors='pt', max_length=1024, padding='max_length', truncation=True); output = model(inputs['input_ids'], attention_mask=inputs['attention_mask']); print(tokenizer.decode(output.logits[0], skip_special_tokens=True))` Method 2: Google Apps Script * Open Google Apps Script ([script.google.com](http://script.google.com)) * Create a new project * Install the `transformers` library by running `npm install transformers` * Import the `transformers` library and load the ChatGPT model using `const { AutoModelForCausalLM, AutoTokenizer } = require('transformers'); const model = new AutoModelForCausalLM('chatgpt'); const tokenizer = new AutoTokenizer('chatgpt');` * Use the model to generate text using `const inputText = "Your input here"; const inputs = tokenizer.encodePlus(inputText, { return_tensors: 'pt', max_length: 1024, padding: 'max_length', truncation: true }); const output = model(inputs.inputIds, inputs.attentionMask); console.log(tokenizer.decode(output.logits[0], { skipSpecialTokens: true }));` Note: These methods require some technical knowledge and may have limitations compared to the original ChatGPT model.

Get ChatGPT for Free with Google You can now access ChatGPT, a powerful language model, for free with Google. Here's how: Method 1: Google Colab * Open Google Colab ([colab.research.google.com](http://colab.research.google.com)) * Create a new notebook * Install the `transformers` library by running `!pip install transformers` * Import the `transformers` library and load the ChatGPT model using `from transformers import AutoModelForCausalLM, AutoTokenizer; model = AutoModelForCausalLM.from_pretrained('chatgpt'); tokenizer = AutoTokenizer.from_pretrained('chatgpt')` * Use the model to generate text using `input_text = "Your input here"; inputs = tokenizer.encode_plus(input_text, return_tensors='pt', max_length=1024, padding='max_length', truncation=True); output = model(inputs['input_ids'], attention_mask=inputs['attention_mask']); print(tokenizer.decode(output.logits[0], skip_special_tokens=True))` Method 2: Google Apps Script * Open Google Apps Script ([script.google.com](http://script.google.com)) * Create a new project * Install the `transformers` library by running `npm install transformers` * Import the `transformers` library and load the ChatGPT model using `const { AutoModelForCausalLM, AutoTokenizer } = require('transformers'); const model = new AutoModelForCausalLM('chatgpt'); const tokenizer = new AutoTokenizer('chatgpt');` * Use the model to generate text using `const inputText = "Your input here"; const inputs = tokenizer.encodePlus(inputText, { return_tensors: 'pt', max_length: 1024, padding: 'max_length', truncation: true }); const output = model(inputs.inputIds, inputs.attentionMask); console.log(tokenizer.decode(output.logits[0], { skipSpecialTokens: true }));` Note: These methods require some technical knowledge and may have limitations compared to the original ChatGPT model.

How to Add ChatGPT to All Google Searches ===================================================== Step 1: Create a Custom Search Engine -------------------------------------- * Go to the [Google Custom Search Engine](https://cse.google.com/) website and sign in with your Google account. * Click on the "New Search Engine" button. * Fill in the required information, such as the name and description of your search engine. * Click on the "Create" button. Step 2: Add ChatGPT to the Search Engine ----------------------------------------- * In the "Setup" tab, click on the "Add" button next to "Sites to search". * Enter the following URL: `https://chat.openai.com/` * Click on the "Add" button. Step 3: Configure the Search Engine -------------------------------------- * In the "Setup" tab, click on the "Edit" button next to "Search engine keywords". * Add the following keywords: `ChatGPT` * Click on the "Save" button. Step 4: Get the Search Engine Code ------------------------------------- * In the "Setup" tab, click on the "Get code" button. * Copy the HTML code provided. Step 5: Add the Search Engine to Your Browser ------------------------------------------------ * Open your browser and go to the "Settings" or "Options" page. * Look for the "Search engine" or "Default search engine" option. * Click on the "Add" or "Manage search engines" button. * Paste the HTML code you copied earlier. * Click on the "Add" or "Save" button. You're Done! =============== Now, whenever you search on Google, ChatGPT will be included in the search results. You can also use the custom search engine URL provided by Google to search directly.

193.90 M
Grimo - Cursor for Writing
View Detail

Grimo - Cursor for Writing

Grimo - Cursor for Writing

The most powerful AI text editor. Coherent editing. Customized styling. Collaborate seamlessly.

1.36 K
Hey Reach
View Detail

Hey Reach

Hey Reach

A simple extension to link your LinkedIn account and HeyReach

193.90 M
Difr | Career Growth for the People
View Detail

Difr | Career Growth for the People

Difr | Career Growth for the People

Easily extract job listing details for tracking in Diffr

193.90 M
instasponse.ai Official - Instant AI Responses for Booking.com Hosts
View Detail

instasponse.ai Official - Instant AI Responses for Booking.com Hosts

instasponse.ai Official - Instant AI Responses for Booking.com Hosts

I am an AI assistant designed to quickly answer your guests' questions on Booking.com.

193.90 M
GPTBLOX - Save ChatGPT Conversations & Hunt GPTs
View Detail

GPTBLOX - Save ChatGPT Conversations & Hunt GPTs

GPTBLOX - Save ChatGPT Conversations & Hunt GPTs

Discover the Power of GPT Store: Explore, Save, and Organize Conversations and Articles Explore the vast collection of GPTs released by the GPT Store, featuring conversations and articles from popular AI models like ChatGPT, Bard, Claude, and HuggingChat. This innovative platform allows you to: * Save conversations: Preserve valuable interactions with AI models for future reference or sharing. * Organize content: Categorize and group conversations and articles by topic, theme, or project, making it easy to access and review relevant information. Unlock the full potential of the GPT Store and streamline your workflow with its intuitive conversation and article management system.

193.90 M
Spot Translator 

This is a simple tool to translate text from one language to another. 

How to use:

1. Enter the text you want to translate in the input box.
2. Choose the source language from the dropdown menu.
3. Choose the target language from the dropdown menu.
4. Click the "Translate" button.

The translated text will appear in the output box.
View Detail

Spot Translator This is a simple tool to translate text from one language to another. How to use: 1. Enter the text you want to translate in the input box. 2. Choose the source language from the dropdown menu. 3. Choose the target language from the dropdown menu. 4. Click the "Translate" button. The translated text will appear in the output box.

Spot Translator This is a simple tool to translate text from one language to another. How to use: 1. Enter the text you want to translate in the input box. 2. Choose the source language from the dropdown menu. 3. Choose the target language from the dropdown menu. 4. Click the "Translate" button. The translated text will appear in the output box.

Just click and get the translation right below.

193.90 M