Open-source RightAI Tools Directory
  • Discover AI
  • Submit
  • Startup
  • Blog
Open-source RightAI Tools Directory
Discover the best AI tools of 2025 with the RightAI Tools Directory!

Friend Links

AI Anime GeneratorToolsApp AI

Support

Tap4
Privacy policyTerms & ConditionsContact Us
Loading...
loading...

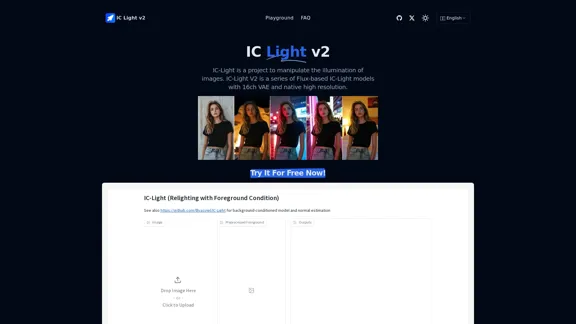
IC Light v2

IC-Light is a project to manipulate the illumination of images. IC-Light V2 is a series of Flux-based IC-Light models with 16ch VAE and native high resolution.
Visit Website
IC Light v2
Visit Website

Introduction

IC-Light is a project designed to manipulate image illumination, allowing users to enhance and adjust lighting in images effectively. The IC-Light V2 series features advanced models based on Flux technology, equipped with a 16-channel Variational Autoencoder (VAE) and supports high-resolution outputs. Users can try the tool for free and explore its capabilities in image relighting.

Feature

  1. Text-Conditioned and Background-Conditioned Models

    IC-Light offers two types of models: one that adjusts lighting based on text input and another that focuses on background conditions, allowing for versatile image manipulation.

  2. High-Resolution Support

    The models support native high resolution, ensuring that the output images maintain quality and detail.

  3. Flexible Image Sizes

    IC-Light AI supports a wide range of image dimensions, with widths and heights available from 256 to 1024 pixels.

  4. Lighting Angle Options

    Users can choose from several lighting angles, including Left Light, Right Light, Top Light, and Bottom Light, to achieve the desired effect.

  5. Image Format Compatibility

    The tool supports popular image formats such as JPG, JPEG, PNG, and WEBP, making it easy to work with various file types.

  6. Fast Image Generation

    Image generation typically takes between 10 to 20 seconds, although wait times may increase during peak usage.

How to Use?

  1. Start by uploading a clear and high-resolution image to ensure the best results.
  2. Experiment with different lighting angles to see how they affect the overall image quality.
  3. Utilize the text-conditioned model for specific lighting adjustments based on descriptive input.
  4. Be aware of potential queuing times during high-demand periods when using the free trial.

FAQ

What is IC-Light?

IC-Light is a project that focuses on manipulating image illumination, allowing users to enhance lighting effects in their images.

What is IC-Light V2?

IC-Light V2 is a series of models based on Flux technology, featuring a 16-channel VAE that supports high-resolution image outputs.

What image sizes does IC-Light AI support?

IC-Light AI supports a variety of image sizes, with widths and heights ranging from 256 to 1024 pixels.

How does IC-Light AI ensure high-quality image generation?

High-quality images are achieved by providing clear and complete original images at the highest possible resolution.

Is there a fee for using IC-Light AI?

IC-Light AI offers free trials, but users may need to purchase Credits for enhanced support services due to the resource-intensive nature of lighting adjustments.

How long does it take for IC-Light AI to generate images?

Typically, image generation takes between 10 and 20 seconds, but wait times may vary during peak usage.

Price

  • Free Trial: $0
  • Credits for Enhanced Support: Pricing varies
The price is for reference only, please refer to the latest official data for actual information.

Evaluation

  1. IC-Light effectively enhances image illumination, providing users with powerful tools for lighting adjustments.
  2. The variety of models and lighting angles allows for creative flexibility in image manipulation.
  3. However, the need for high-resolution input images may limit usability for users with lower-quality images.
  4. The potential for queuing during high-demand periods could frustrate users seeking immediate results.
  5. Overall, IC-Light is a valuable tool for those looking to improve their image quality through advanced lighting techniques, but users should be prepared for possible wait times and the necessity of high-quality input images.

Related Websites
Baidu AI Partner
View Detail

Baidu AI Partner

Baidu AI Partner

Baidu AI Partner is your personal AI assistant on any page, helping you read quickly, providing creative inspiration, and answering your questions in chat conversations.

193.90 M
Two-Way Voice for Gemini™
View Detail

Two-Way Voice for Gemini™

Two-Way Voice for Gemini™

This extension for Google Gemini™ lets you ask questions using your voice and listen to the answers.

193.90 M
IC Light v2
View Detail

IC Light v2

IC Light v2

IC-Light is a project to manipulate the illumination of images. IC-Light V2 is a series of Flux-based IC-Light models with 16ch VAE and native high resolution.

0
Red Panda AI | A New Future of AI Image Generation
View Detail

Red Panda AI | A New Future of AI Image Generation

Red Panda AI | A New Future of AI Image Generation

Transform your designs with our professional AI red panda image generator. Create stunning artwork with perfect text placement, vector support, and consistent style. Start creating for free.

688
Batch Save ChatGPT to Notion

This is a guide on how to save multiple ChatGPT responses to Notion in a batch. 

Tools You'll Need:

* ChatGPT: An AI chatbot that can generate text.
* Notion: A note-taking and project management tool.
* Python: A programming language.
* Requests Library: A Python library for making HTTP requests.

Steps:

1. Get Your Notion API Token:
   - Go to your Notion workspace settings.
   - Navigate to the "Integrations" tab.
   - Click "Create new integration" and choose "API Token".
   - Copy your API token.

2. Install Python Libraries:
   - Open your terminal or command prompt.
   - Type `pip install requests` and press Enter.

3. Write Python Script:
   - Create a new Python file (e.g., `save_chatgpt_to_notion.py`).
   - Paste the following code into the file, replacing `YOUR_NOTION_API_TOKEN` with your actual token:

```python
import requests

def save_chatgpt_response_to_notion(response, page_id, token):
  """Saves a ChatGPT response to a Notion page."""
  url = f"https://api.notion.com/v1/pages/{page_id}/children"
  headers = {"Authorization": f"Bearer {token}"}
  data = {
    "parent": {
      "page_id": page_id
    },
    "properties": {
      "title": {
        "title": [
          {
            "text": {
              "content": "ChatGPT Response"
            }
          }
        ]
      },
      "content": {
        "rich_text": [
          {
            "text": {
              "content": response
            }
          }
        ]
      }
    }
  }
  response = requests.post(url, headers=headers, json=data)
  print(response.status_code)

Example usage
page_id = "YOUR_NOTION_PAGE_ID"
token = "YOUR_NOTION_API_TOKEN"

Get ChatGPT responses (replace with your actual ChatGPT interaction)
chatgpt_responses = [
  "This is the first ChatGPT response.",
  "This is the second ChatGPT response.",
  "This is the third ChatGPT response."
]

Save each response to Notion
for response in chatgpt_responses:
  save_chatgpt_response_to_notion(response, page_id, token)
```

4. Run the Script:
   - In your terminal, navigate to the directory where you saved the Python file.
   - Type `python save_chatgpt_to_notion.py` and press Enter.

5. Check Notion:
   - Open your Notion workspace and go to the page specified by `page_id`.
   - You should see your ChatGPT responses saved as separate blocks.
View Detail

Batch Save ChatGPT to Notion This is a guide on how to save multiple ChatGPT responses to Notion in a batch. Tools You'll Need: * ChatGPT: An AI chatbot that can generate text. * Notion: A note-taking and project management tool. * Python: A programming language. * Requests Library: A Python library for making HTTP requests. Steps: 1. Get Your Notion API Token: - Go to your Notion workspace settings. - Navigate to the "Integrations" tab. - Click "Create new integration" and choose "API Token". - Copy your API token. 2. Install Python Libraries: - Open your terminal or command prompt. - Type `pip install requests` and press Enter. 3. Write Python Script: - Create a new Python file (e.g., `save_chatgpt_to_notion.py`). - Paste the following code into the file, replacing `YOUR_NOTION_API_TOKEN` with your actual token: ```python import requests def save_chatgpt_response_to_notion(response, page_id, token): """Saves a ChatGPT response to a Notion page.""" url = f"https://api.notion.com/v1/pages/{page_id}/children" headers = {"Authorization": f"Bearer {token}"} data = { "parent": { "page_id": page_id }, "properties": { "title": { "title": [ { "text": { "content": "ChatGPT Response" } } ] }, "content": { "rich_text": [ { "text": { "content": response } } ] } } } response = requests.post(url, headers=headers, json=data) print(response.status_code) Example usage page_id = "YOUR_NOTION_PAGE_ID" token = "YOUR_NOTION_API_TOKEN" Get ChatGPT responses (replace with your actual ChatGPT interaction) chatgpt_responses = [ "This is the first ChatGPT response.", "This is the second ChatGPT response.", "This is the third ChatGPT response." ] Save each response to Notion for response in chatgpt_responses: save_chatgpt_response_to_notion(response, page_id, token) ``` 4. Run the Script: - In your terminal, navigate to the directory where you saved the Python file. - Type `python save_chatgpt_to_notion.py` and press Enter. 5. Check Notion: - Open your Notion workspace and go to the page specified by `page_id`. - You should see your ChatGPT responses saved as separate blocks.

Batch Save ChatGPT to Notion This is a guide on how to save multiple ChatGPT responses to Notion in a batch. Tools You'll Need: * ChatGPT: An AI chatbot that can generate text. * Notion: A note-taking and project management tool. * Python: A programming language. * Requests Library: A Python library for making HTTP requests. Steps: 1. Get Your Notion API Token: - Go to your Notion workspace settings. - Navigate to the "Integrations" tab. - Click "Create new integration" and choose "API Token". - Copy your API token. 2. Install Python Libraries: - Open your terminal or command prompt. - Type `pip install requests` and press Enter. 3. Write Python Script: - Create a new Python file (e.g., `save_chatgpt_to_notion.py`). - Paste the following code into the file, replacing `YOUR_NOTION_API_TOKEN` with your actual token: ```python import requests def save_chatgpt_response_to_notion(response, page_id, token): """Saves a ChatGPT response to a Notion page.""" url = f"https://api.notion.com/v1/pages/{page_id}/children" headers = {"Authorization": f"Bearer {token}"} data = { "parent": { "page_id": page_id }, "properties": { "title": { "title": [ { "text": { "content": "ChatGPT Response" } } ] }, "content": { "rich_text": [ { "text": { "content": response } } ] } } } response = requests.post(url, headers=headers, json=data) print(response.status_code) Example usage page_id = "YOUR_NOTION_PAGE_ID" token = "YOUR_NOTION_API_TOKEN" Get ChatGPT responses (replace with your actual ChatGPT interaction) chatgpt_responses = [ "This is the first ChatGPT response.", "This is the second ChatGPT response.", "This is the third ChatGPT response." ] Save each response to Notion for response in chatgpt_responses: save_chatgpt_response_to_notion(response, page_id, token) ``` 4. Run the Script: - In your terminal, navigate to the directory where you saved the Python file. - Type `python save_chatgpt_to_notion.py` and press Enter. 5. Check Notion: - Open your Notion workspace and go to the page specified by `page_id`. - You should see your ChatGPT responses saved as separate blocks.

Save ChatGPT Conversations to Notion with One Click Export your ChatGPT conversations directly to Notion with a single click.

193.90 M
PNG Maker Online Free: Convert Text to PNG with Transparent Backgrounds
View Detail

PNG Maker Online Free: Convert Text to PNG with Transparent Backgrounds

PNG Maker Online Free: Convert Text to PNG with Transparent Backgrounds

Effortlessly create high-quality PNG images using PNG maker. Our png maker online free tool transforms text to PNG with customizable options. Ideal for web designers and content creators needing a transparent PNG maker.

121.14 K
Idolly
View Detail

Idolly

Idolly

Explore idolly.ai, where imagination meets AI image creation and BlockChain. Create stunning visuals with ease using our Face Transfer and Mood Fusion technology.

9.70 K
Super Time Travel - Explore the Past... and the Future
View Detail

Super Time Travel - Explore the Past... and the Future

Super Time Travel - Explore the Past... and the Future

Super Time Travel lets you upload your photos and see them transformed to any past or future year. Experience your images as they would appear in any historical era or future setting with the magic of AI.

0