Open-source RightAI Tools Directory
  • Discover AI
  • Submit
  • Startup
  • Blog
Open-source RightAI Tools Directory
Discover the best AI tools of 2025 with the RightAI Tools Directory!

Friend Links

AI Anime GeneratorToolsApp AI

Support

Tap4
Privacy policyTerms & ConditionsContact Us
Loading...
loading...

Unblur Image Unblur image refers to the process of removing blur or haze from an image to make it sharper and clearer. This technique is often used to enhance the quality of images that have been affected by camera shake, motion blur, or other factors that cause blur.

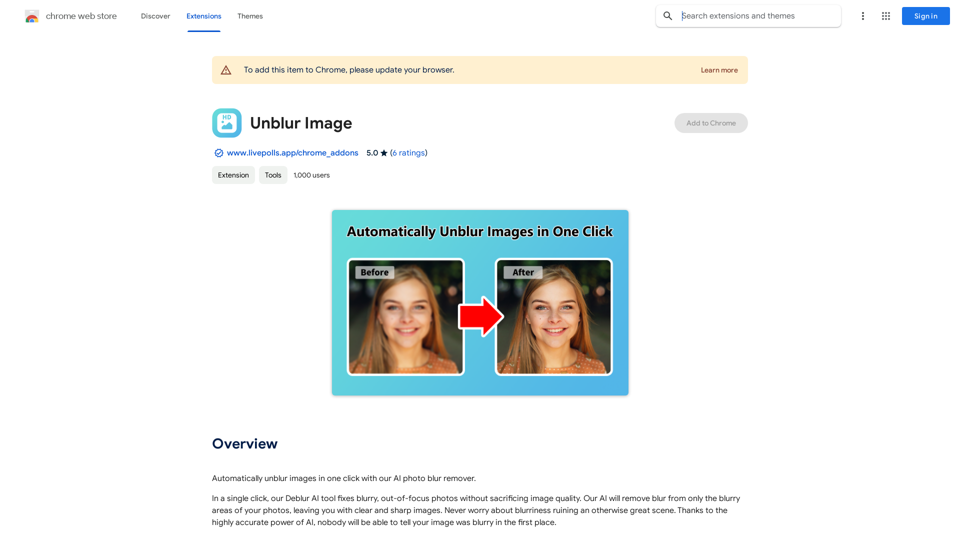
Automatically unblur images in one click with our AI photo blur remover.
Visit Website
Unblur Image

Unblur image refers to the process of removing blur or haze from an image to make it sharper and clearer. This technique is often used to enhance the quality of images that have been affected by camera shake, motion blur, or other factors that cause blur.
Visit Website

Introduction

Unblur Image is an AI-powered photo blur remover that automatically fixes blurry, out-of-focus photos without compromising image quality. Using highly accurate AI technology, it selectively removes blur from affected areas, resulting in clear and sharp images. This free tool is easy to use and produces high-quality results, making it an excellent solution for enhancing blurry photos.

Feature

AI-Powered Blur Removal

Unblur Image utilizes advanced AI technology to automatically detect and remove blur from photos, focusing only on the affected areas while preserving image quality.

User-Friendly Interface

The tool offers a simple, intuitive process:

  1. Upload your blurry photo
  2. Click the "Unblur" button
  3. Wait for AI processing
  4. Download the clear, sharp result

High-Quality Output

Unblur Image ensures high-quality results, producing clear and sharp images without sacrificing detail or introducing artifacts.

Free to Use

The tool is completely free, with no subscription or payment required, making it accessible to all users.

Adjustable Settings

Users can fine-tune the blur removal process by adjusting settings to achieve optimal results for different types of photos.

Multiple Use Capability

The tool can be used multiple times on the same image to remove blur from different areas, allowing for precise and thorough enhancement.

FAQ

How does Unblur Image work?

Unblur Image employs advanced AI technology to automatically analyze and remove blur from photos. The AI identifies blurry areas and applies targeted corrections to enhance clarity and sharpness.

Is there a limit to how many times I can use Unblur Image?

No, there is no limit. You can use Unblur Image multiple times on the same photo to remove blur from different areas or to achieve the desired level of clarity.

What types of photos work best with Unblur Image?

For optimal results, use high-quality photos that are not excessively blurry or distorted. However, the tool can improve a wide range of blurry images.

Can I adjust the level of blur removal?

Yes, Unblur Image allows you to adjust settings to fine-tune the blur removal process, helping you achieve the best results for your specific photo.

Is my photo data safe when using Unblur Image?

While the website doesn't explicitly mention data privacy, it's always advisable to check the platform's privacy policy. As a free online tool, it's recommended to avoid uploading sensitive or personal images.

Latest Traffic Insights

  • Monthly Visits

    290.25 M

  • Bounce Rate

    55.49%

  • Pages Per Visit

    2.84

  • Time on Site(s)

    113.64

  • Global Rank

    -

  • Country Rank

    -

Recent Visits

Traffic Sources

  • Social Media:
    0.68%
  • Paid Referrals:
    0.54%
  • Email:
    0.11%
  • Referrals:
    14.58%
  • Search Engines:
    15.20%
  • Direct:
    68.89%
More Data

Related Websites

Nova Headshot
View Detail

Nova Headshot

Nova Headshot

AI Headshot Generator

0
BigJpg AI
View Detail

BigJpg AI

BigJpg AI

BigJPG AI: The excellent image upscaler. It enlarges photos beyond limits, delivering crystal-clear results. User-friendly BigJPG creates print-quality enlargements.

28.66 K
Flux-1
View Detail

Flux-1

Flux-1

FLUX.1 is a new open-source image generation model developed by Black Forest Labs

39.33 K
100% Free AI Image Generator: Text to Image Online | insMind
View Detail

100% Free AI Image Generator: Text to Image Online | insMind

100% Free AI Image Generator: Text to Image Online | insMind

Looking for a free AI image generator from text? Create stunning images with a simple text prompt using the most advanced AI text-to-image generator.

10.17 M
Bing AI Image Generator
View Detail

Bing AI Image Generator

Bing AI Image Generator

Bing AI Image Generator: See your ideas come to life with AI. Tell the AI what you want to see, and it will create the image in your browser right away.

290.25 M
My AI
View Detail

My AI

My AI

AI enables all social media platforms, e-commerce platforms, and websites that you visit.

290.25 M
ChatGPT on Google
View Detail

ChatGPT on Google

ChatGPT on Google

Use Google to access ChatGPT and see the AI chatbot's answers next to regular search results.

290.25 M
Batch Save ChatGPT to Notion

This is a guide on how to save multiple ChatGPT responses to Notion in a batch. 

Tools You'll Need:

* ChatGPT: An AI chatbot that can generate text.
* Notion: A note-taking and project management tool.
* Python: A programming language.
* Requests Library: A Python library for making HTTP requests.

Steps:

1. Get Your Notion API Token:
   - Go to your Notion workspace settings.
   - Navigate to the "Integrations" tab.
   - Click "Create new integration" and choose "API Token".
   - Copy your API token.

2. Install Python Libraries:
   - Open your terminal or command prompt.
   - Type `pip install requests` and press Enter.

3. Write Python Script:
   - Create a new Python file (e.g., `save_chatgpt_to_notion.py`).
   - Paste the following code into the file, replacing `YOUR_NOTION_API_TOKEN` with your actual token:

```python
import requests

def save_chatgpt_response_to_notion(response, page_id, token):
  """Saves a ChatGPT response to a Notion page."""
  url = f"https://api.notion.com/v1/pages/{page_id}/children"
  headers = {"Authorization": f"Bearer {token}"}
  data = {
    "parent": {
      "page_id": page_id
    },
    "properties": {
      "title": {
        "title": [
          {
            "text": {
              "content": "ChatGPT Response"
            }
          }
        ]
      },
      "content": {
        "rich_text": [
          {
            "text": {
              "content": response
            }
          }
        ]
      }
    }
  }
  response = requests.post(url, headers=headers, json=data)
  print(response.status_code)

Example usage
page_id = "YOUR_NOTION_PAGE_ID"
token = "YOUR_NOTION_API_TOKEN"

Get ChatGPT responses (replace with your actual ChatGPT interaction)
chatgpt_responses = [
  "This is the first ChatGPT response.",
  "This is the second ChatGPT response.",
  "This is the third ChatGPT response."
]

Save each response to Notion
for response in chatgpt_responses:
  save_chatgpt_response_to_notion(response, page_id, token)
```

4. Run the Script:
   - In your terminal, navigate to the directory where you saved the Python file.
   - Type `python save_chatgpt_to_notion.py` and press Enter.

5. Check Notion:
   - Open your Notion workspace and go to the page specified by `page_id`.
   - You should see your ChatGPT responses saved as separate blocks.
View Detail

Batch Save ChatGPT to Notion This is a guide on how to save multiple ChatGPT responses to Notion in a batch. Tools You'll Need: * ChatGPT: An AI chatbot that can generate text. * Notion: A note-taking and project management tool. * Python: A programming language. * Requests Library: A Python library for making HTTP requests. Steps: 1. Get Your Notion API Token: - Go to your Notion workspace settings. - Navigate to the "Integrations" tab. - Click "Create new integration" and choose "API Token". - Copy your API token. 2. Install Python Libraries: - Open your terminal or command prompt. - Type `pip install requests` and press Enter. 3. Write Python Script: - Create a new Python file (e.g., `save_chatgpt_to_notion.py`). - Paste the following code into the file, replacing `YOUR_NOTION_API_TOKEN` with your actual token: ```python import requests def save_chatgpt_response_to_notion(response, page_id, token): """Saves a ChatGPT response to a Notion page.""" url = f"https://api.notion.com/v1/pages/{page_id}/children" headers = {"Authorization": f"Bearer {token}"} data = { "parent": { "page_id": page_id }, "properties": { "title": { "title": [ { "text": { "content": "ChatGPT Response" } } ] }, "content": { "rich_text": [ { "text": { "content": response } } ] } } } response = requests.post(url, headers=headers, json=data) print(response.status_code) Example usage page_id = "YOUR_NOTION_PAGE_ID" token = "YOUR_NOTION_API_TOKEN" Get ChatGPT responses (replace with your actual ChatGPT interaction) chatgpt_responses = [ "This is the first ChatGPT response.", "This is the second ChatGPT response.", "This is the third ChatGPT response." ] Save each response to Notion for response in chatgpt_responses: save_chatgpt_response_to_notion(response, page_id, token) ``` 4. Run the Script: - In your terminal, navigate to the directory where you saved the Python file. - Type `python save_chatgpt_to_notion.py` and press Enter. 5. Check Notion: - Open your Notion workspace and go to the page specified by `page_id`. - You should see your ChatGPT responses saved as separate blocks.

Batch Save ChatGPT to Notion This is a guide on how to save multiple ChatGPT responses to Notion in a batch. Tools You'll Need: * ChatGPT: An AI chatbot that can generate text. * Notion: A note-taking and project management tool. * Python: A programming language. * Requests Library: A Python library for making HTTP requests. Steps: 1. Get Your Notion API Token: - Go to your Notion workspace settings. - Navigate to the "Integrations" tab. - Click "Create new integration" and choose "API Token". - Copy your API token. 2. Install Python Libraries: - Open your terminal or command prompt. - Type `pip install requests` and press Enter. 3. Write Python Script: - Create a new Python file (e.g., `save_chatgpt_to_notion.py`). - Paste the following code into the file, replacing `YOUR_NOTION_API_TOKEN` with your actual token: ```python import requests def save_chatgpt_response_to_notion(response, page_id, token): """Saves a ChatGPT response to a Notion page.""" url = f"https://api.notion.com/v1/pages/{page_id}/children" headers = {"Authorization": f"Bearer {token}"} data = { "parent": { "page_id": page_id }, "properties": { "title": { "title": [ { "text": { "content": "ChatGPT Response" } } ] }, "content": { "rich_text": [ { "text": { "content": response } } ] } } } response = requests.post(url, headers=headers, json=data) print(response.status_code) Example usage page_id = "YOUR_NOTION_PAGE_ID" token = "YOUR_NOTION_API_TOKEN" Get ChatGPT responses (replace with your actual ChatGPT interaction) chatgpt_responses = [ "This is the first ChatGPT response.", "This is the second ChatGPT response.", "This is the third ChatGPT response." ] Save each response to Notion for response in chatgpt_responses: save_chatgpt_response_to_notion(response, page_id, token) ``` 4. Run the Script: - In your terminal, navigate to the directory where you saved the Python file. - Type `python save_chatgpt_to_notion.py` and press Enter. 5. Check Notion: - Open your Notion workspace and go to the page specified by `page_id`. - You should see your ChatGPT responses saved as separate blocks.

Save ChatGPT Conversations to Notion with One Click Export your ChatGPT conversations directly to Notion with a single click.

290.25 M